Integrate Oracle EBS Single Sign-On using Azure Active Directory (AAD)
"Oracle EBS SSO connector by miniOrange enables Single Sign-On between Oracle EBS and Azure Active Directory (AD) without the need to purchase and install Oracle Access Manager (OAM) and Oracle Internet Directory (OID) license."
Integrating Oracle E-Business Suite (EBS) with Azure Active Directory allows users to use their Active Directory (AD) credentials to access EBS, eliminating the need for them to remember and manage separate EBS login credentials. This can be achieved using a third-party connector, such as miniOrange EBS SSO Connector, which acts as a bridge between Azure Active Directory (AD) and EBS, allowing users to log in to EBS using their Active Directory credentials.
In order to enable Active Directory Single Sign-On (SSO) for Oracle EBS using miniOrange Single Sign-On Connector, the connector must be registered as a SAML Service Provider (SP) in Azure Active Directory and AD must be configured as a SAML Identity Provider (IdP) in the connector. When a user tries to log in to EBS, the authentication request is delegated to miniOrange EBS SSO Connector, which redirects the user to Active Directory for login. Upon successful authentication, the user is granted access to EBS.
Oracle EBS Azure Active Directory (AAD) Single Sign-On Authentication Flow with miniOrange Oracle EBS Solution:
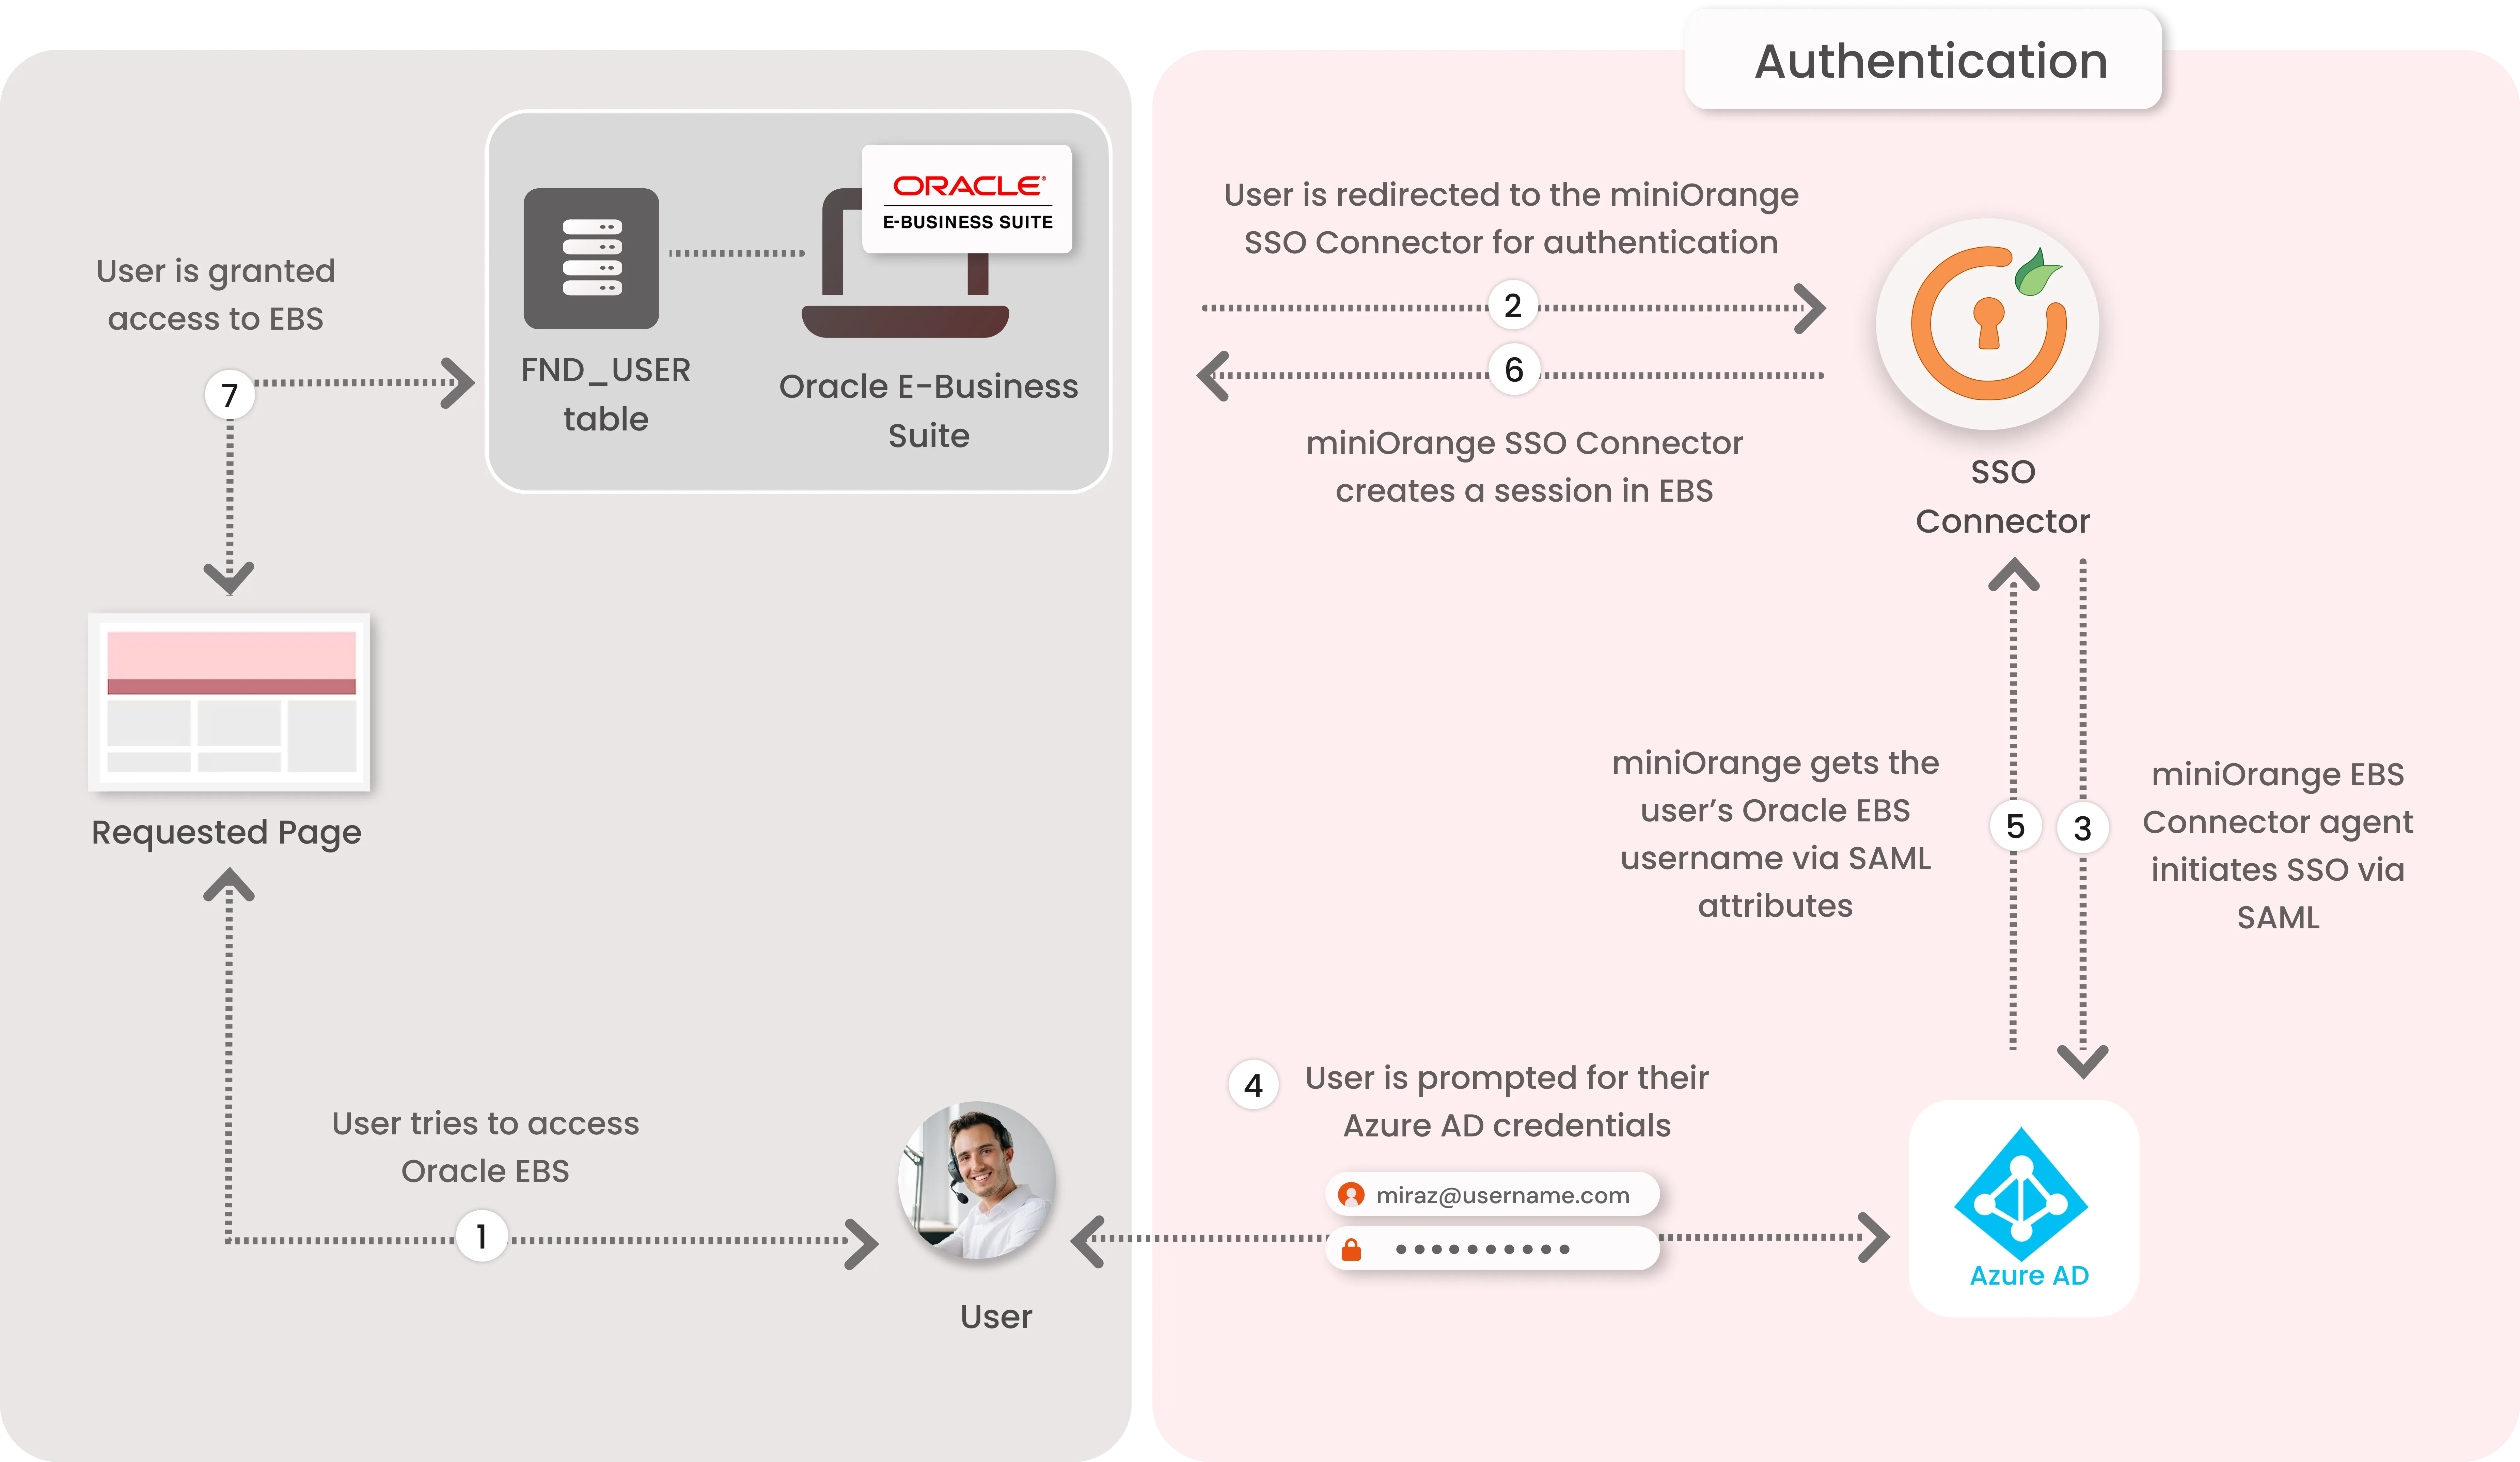
1. The User sends the request to access the Oracle E-Business Suite.
2. Oracle EBS redirects the request to the miniOrange SSO Connector for authentication.
3. The miniOrange SSO Connector redirects the user to Azure Active Directory (AD) for authentication.
4. The user is prompted for their Azure Active Directory credentials, and is authenticated upon a successful response.
5. The connector receives the user’s Oracle EBS registered username/email from Azure AD via SAML attributes.
6. The connector checks the value of the username/email received from Azure AD against the FND_USER table in the Oracle EBS Database.
7. Oracle EBS Session is created for the User if he value of username/email is present.
8. Upon successfully creating a session, user is redirected to the Oracle E-Business Suite portal as logged-in user.
Get Free Installation Help
miniOrange offers free help through a consultation call with our System Engineers to Install or Setup Oracle EBS Azure AD SSO solution in your environment with 30-day free trial.
For this, you need to just send us an email at idpsupport@xecurify.com to book a slot and we'll help you in no time.
Prerequisites
- Download the miniOrange Oracle EBS SSO Connector Contact Us to request for the secure link.
- You can either host the connector on the existing tomcat of oracle Apex that you have or you can download the Apache tomcat 8+ and host connector in this tomcat.
- The connector should be hosted on the same domain as your Oracle EBS Apps Tier; for example, if your Oracle EBS Web Entry FQDN is apps.example.com, the connector can be hosted on ebsauth.example.com.
- Once the connector is set up, modify the file context.xml present under <apache-tomcat-directory> conf & add the following line under the <Context> element:
<CookieProcessor className="org.apache.tomcat.util.http.LegacyCookieProcessor" />
- Your context.xml file should look like this:

- Restart the Apache Tomcat server for this change to take effect.
Follow the step-by-step guide given below for Oracle E-Business Single Sign-On (SSO) with Azure AD
1. Create Oracle EBS User & Generate DBC File
- Login to Oracle EBS as SYSADMIN (or a user with the User Management & Functional Administrator responsibilities).
- Under the User Management responsibility, add a User Account. These user credentials will be configured in the miniOrange SSO Connector for connecting to the Oracle EBS database.
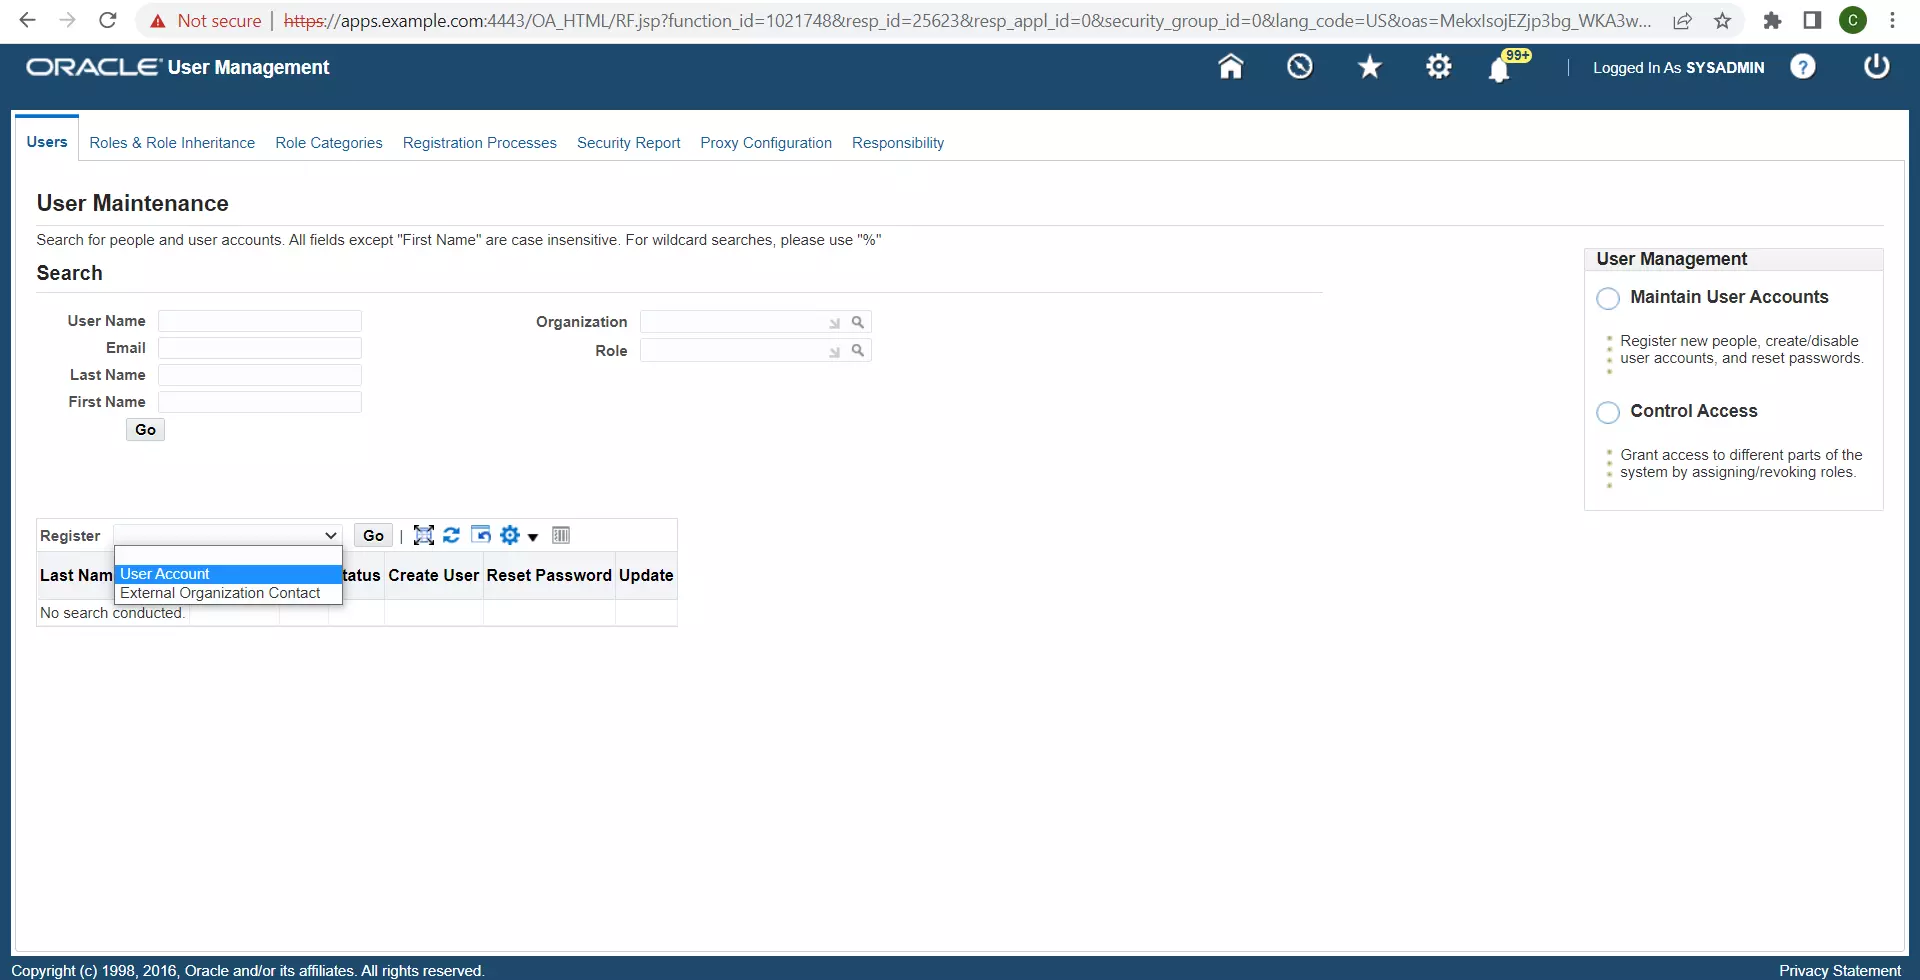
- Assign the role ‘Apps Schema Connect’ to this user.
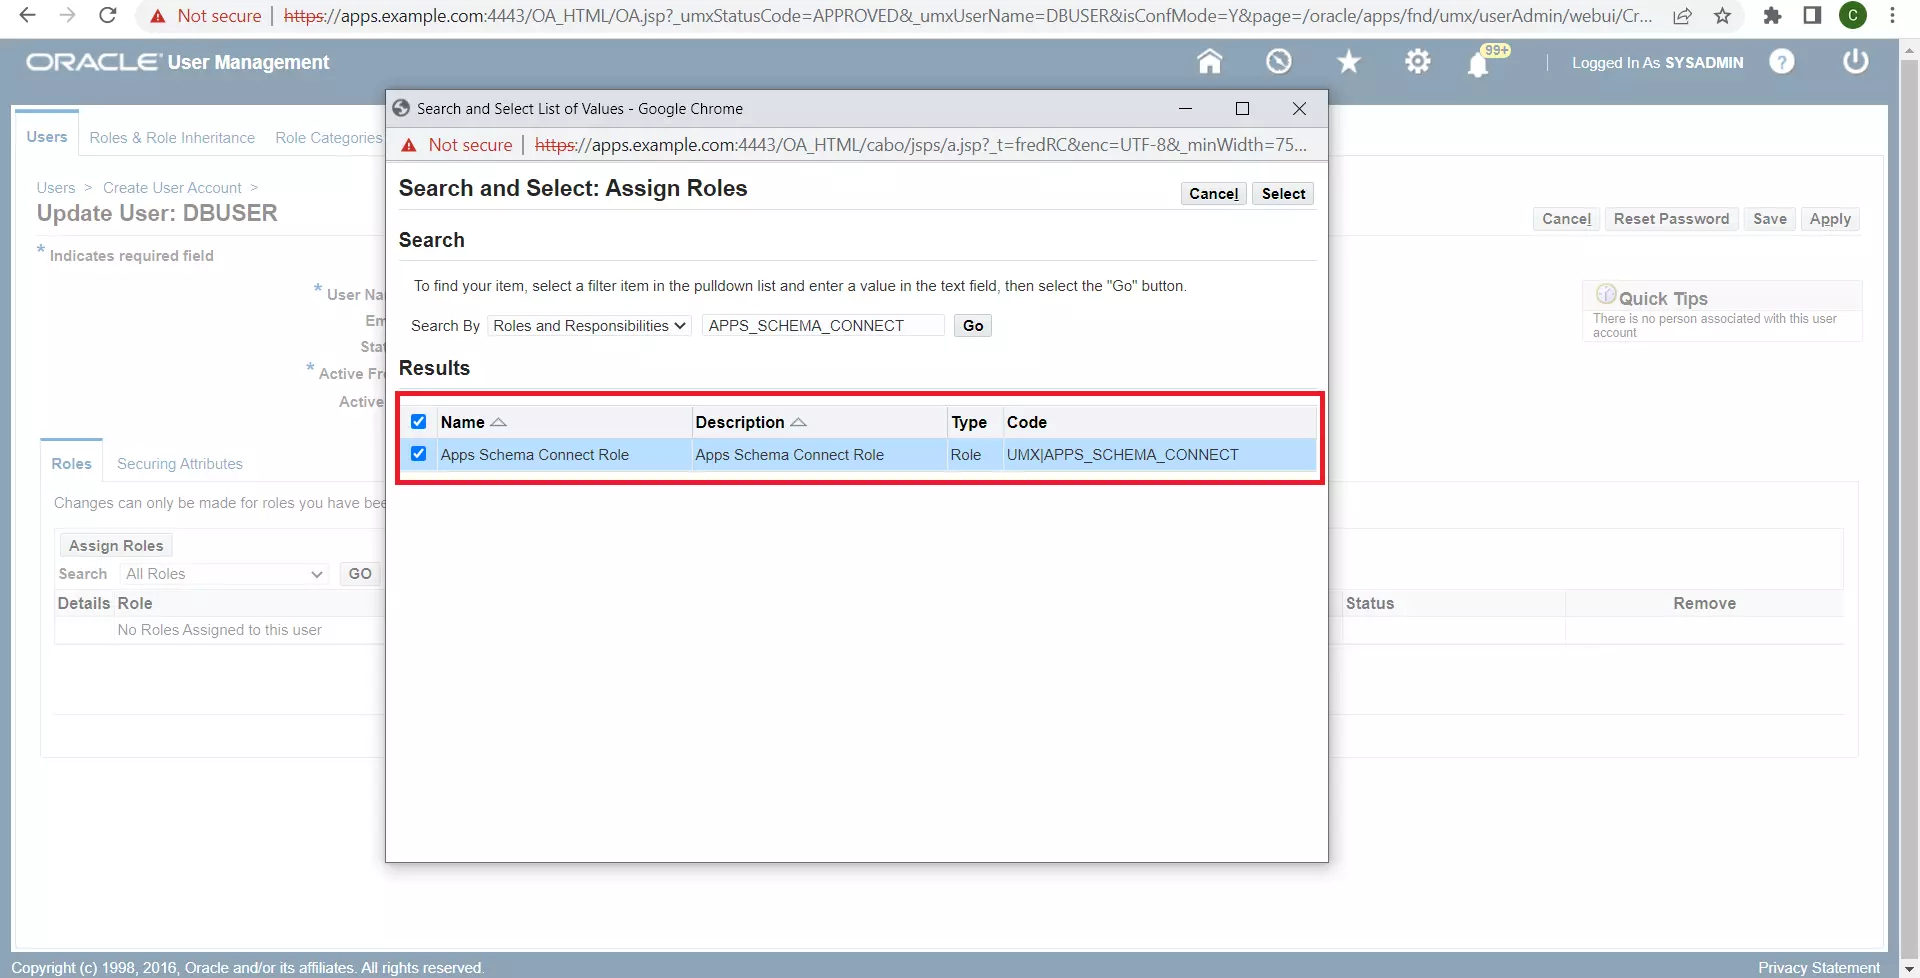
- On the Oracle EBS Linux Environment, generate a new DBC file for use by the miniOrange Oracle EBS SSO Connector. You will need the apps user credentials, and the default DBC file (under $FND_SECURE) used by the Apps Tier. The AdminDesktop utility can be used to generate the new DBC file. You’ll have to specify the name of a new Desktop Node for this DBC file:
java oracle.apps.fnd.security.AdminDesktop <apps-username>/<apps-password>
CREATE NODE_NAME=<miniorange-sso-connector-fqdn> DBC=<path-to-existing-dbc-file>
- This will generate a file called <$TWO_TASK>_<miniorange-sso-connector-fqdn>.dbc in the same location as where your ran the previous command.
- Copy over this DBC file to the miniOrange SSO Connector server.
2. Setup miniOrange EBS SSO Connector Part-1
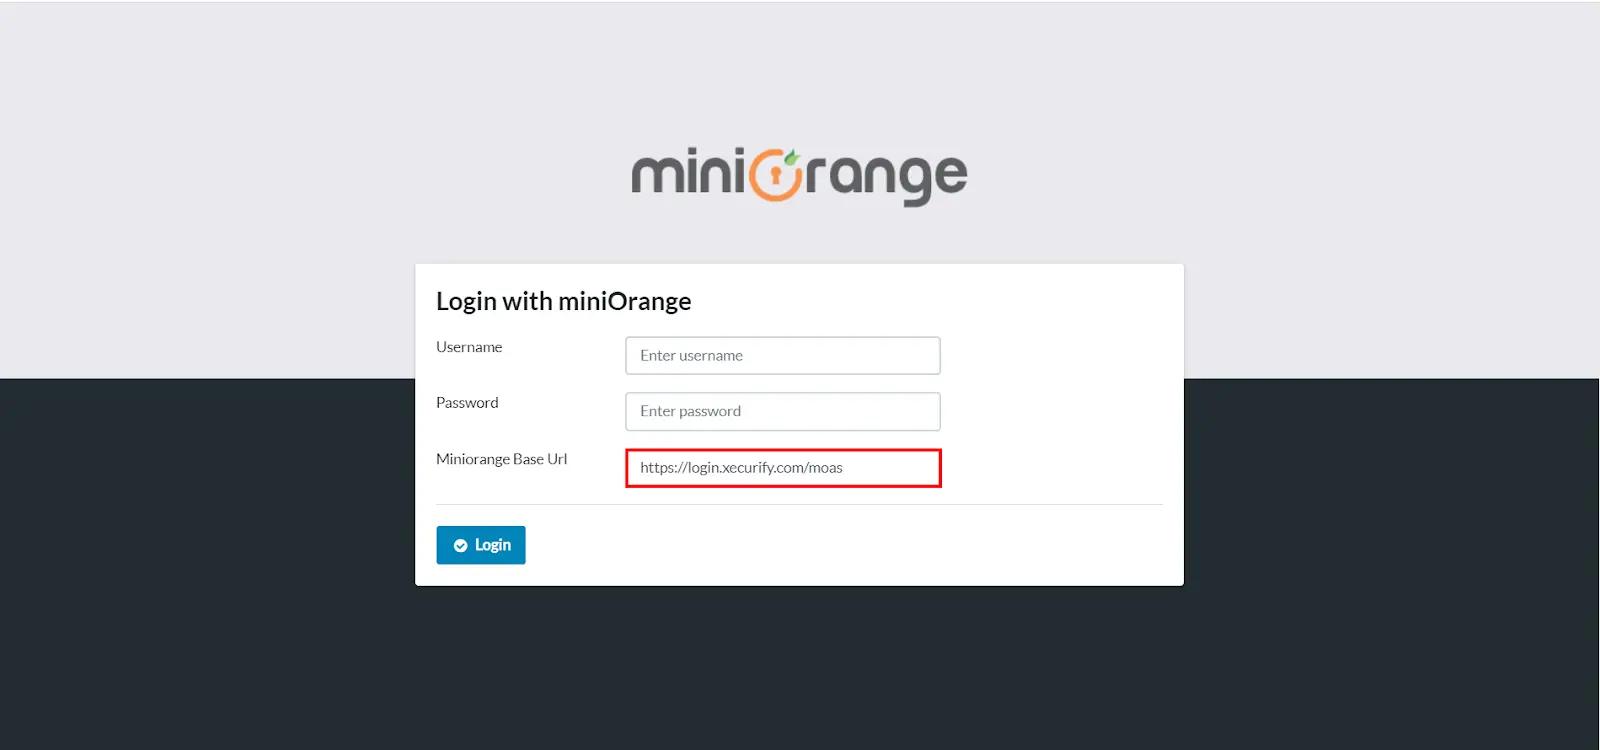
- Login into oracle ebs with username, password and miniOrange Cloud IdP Base URL (either branding URL - https://.xecurify.com/moas OR https://login.xecurify.com/moas).
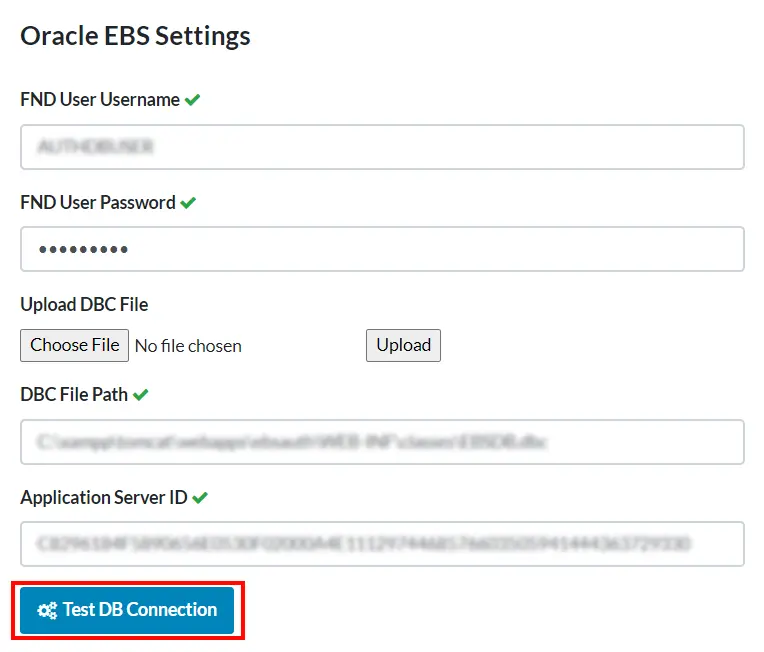
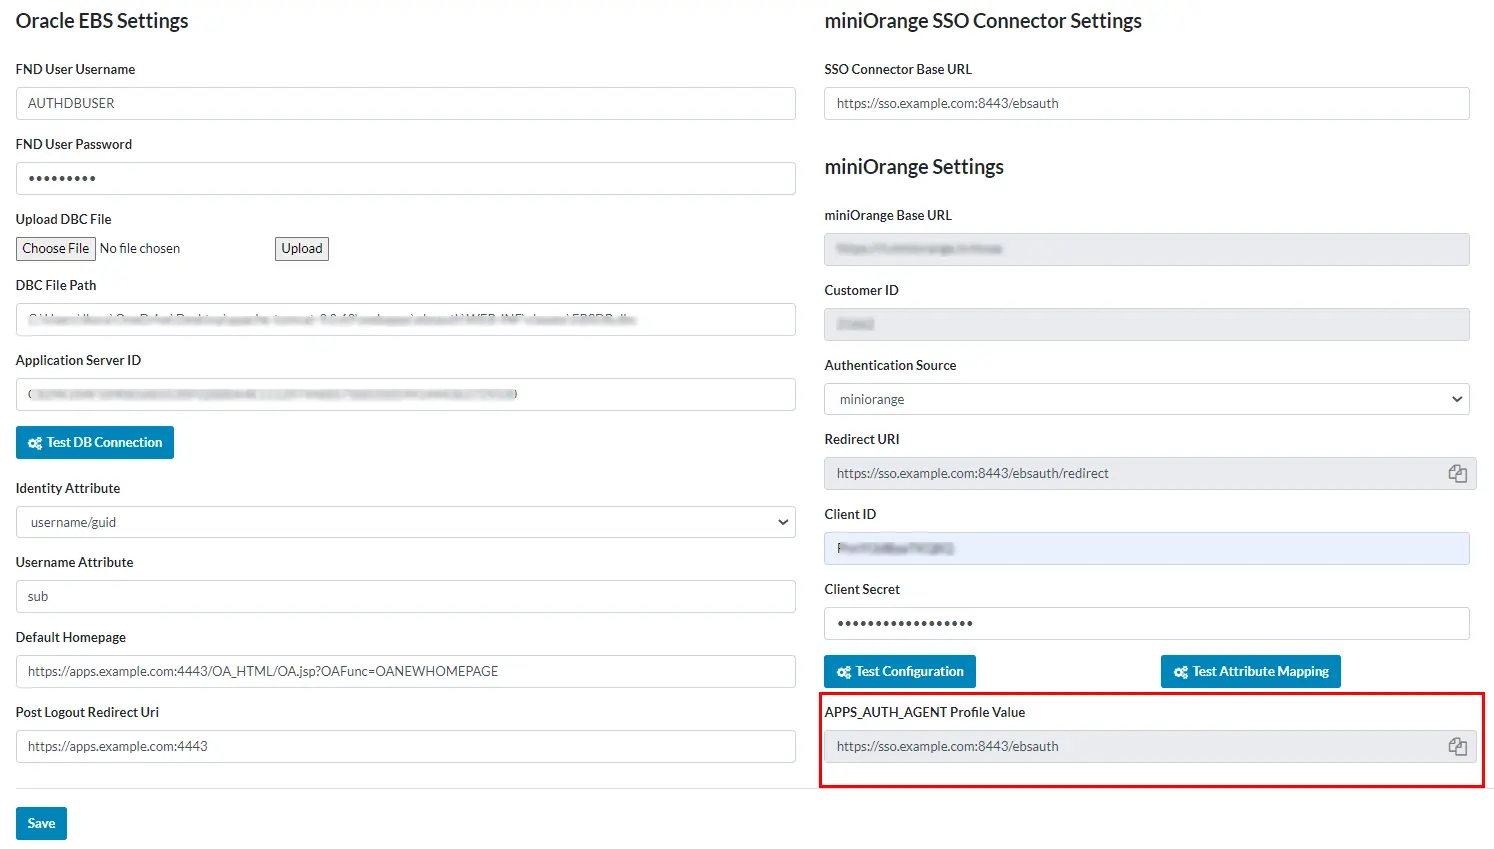
- After Successful login you will be redirected to the configuration page. Here You have to enter the FND User name and FND User Password. For the DBC file path and Application server ID, you can manually fill these two or you can upload the file and it will automatically fetch these fields. Now click the Save button to save the configuration, then click Test DB Connection button to see if the filled-in details are correct.
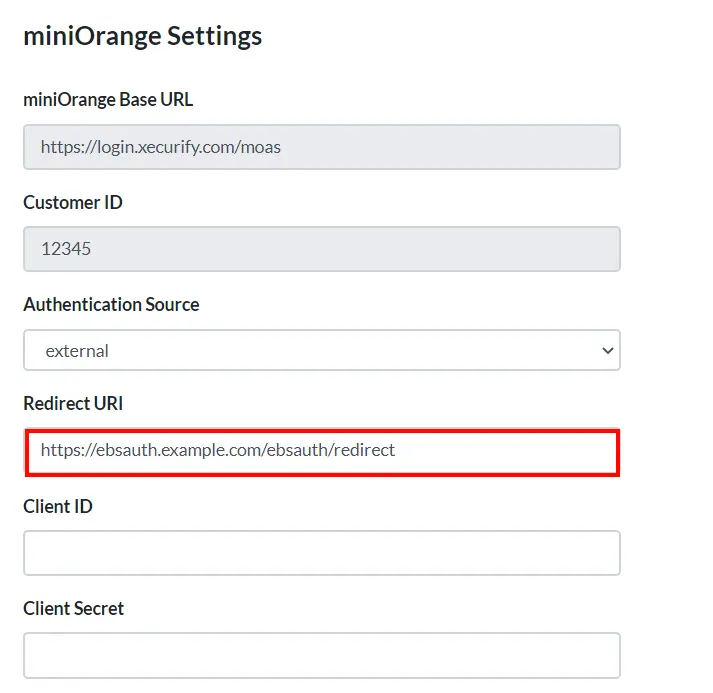
- Copy the Redirect URI which will be used in further step.
3. miniOrange OAuth Application Setup
- Log in as a customer from the Admin Console.
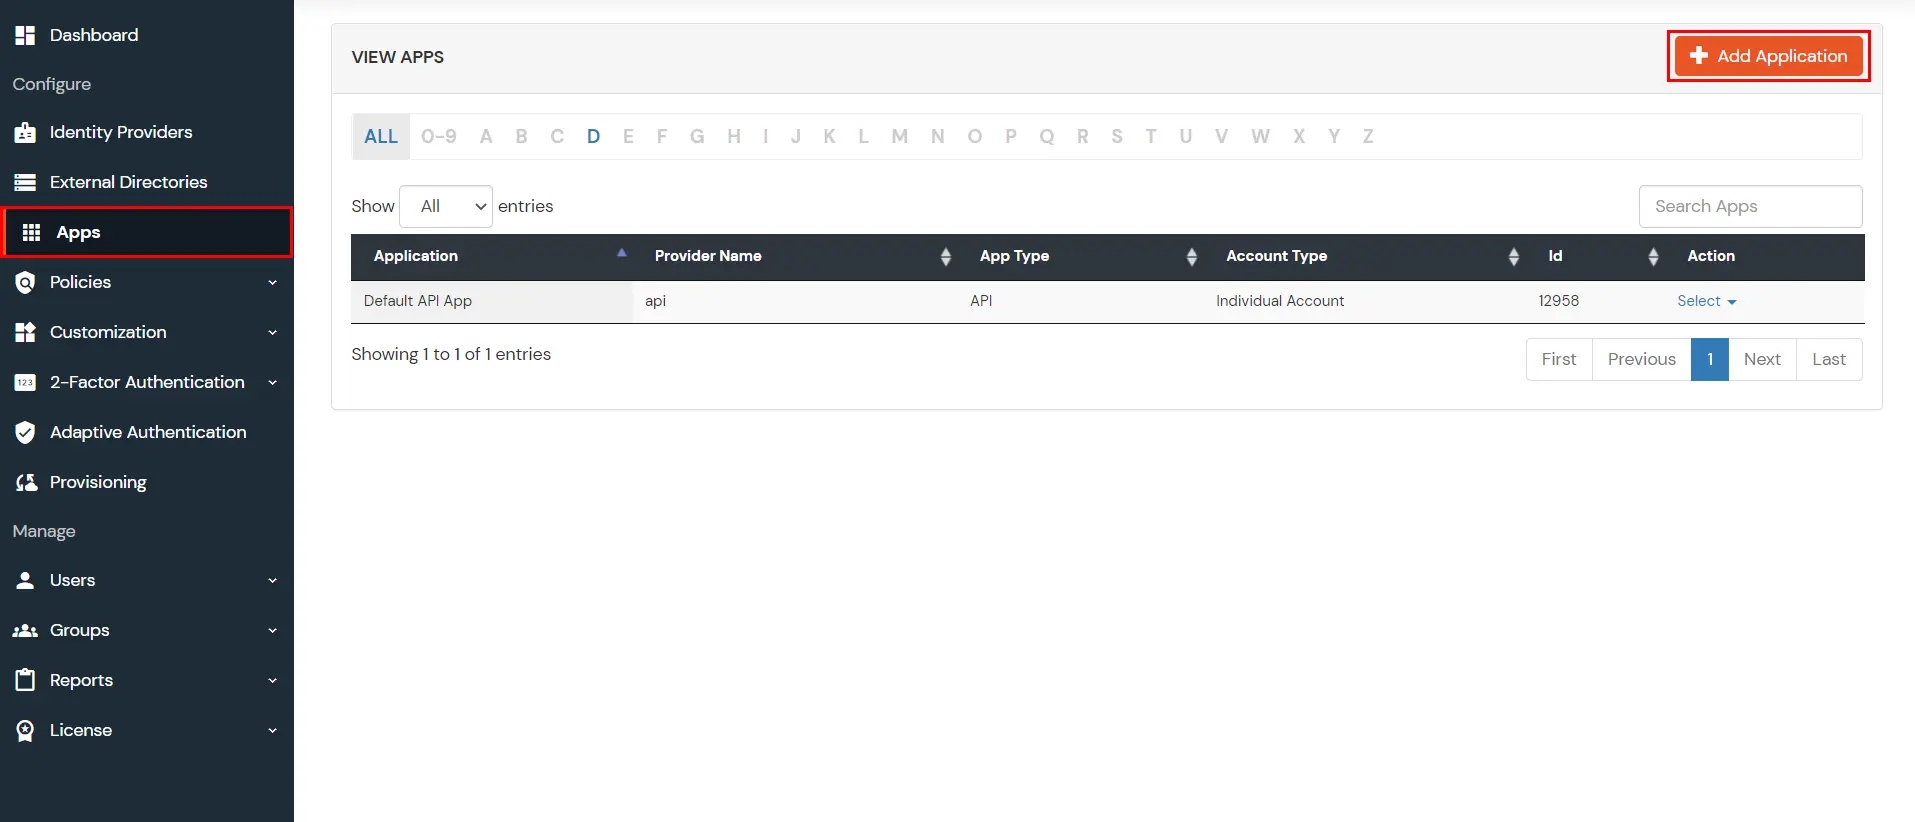
- Go to Apps. Click Add Application button at right corner of your screen.
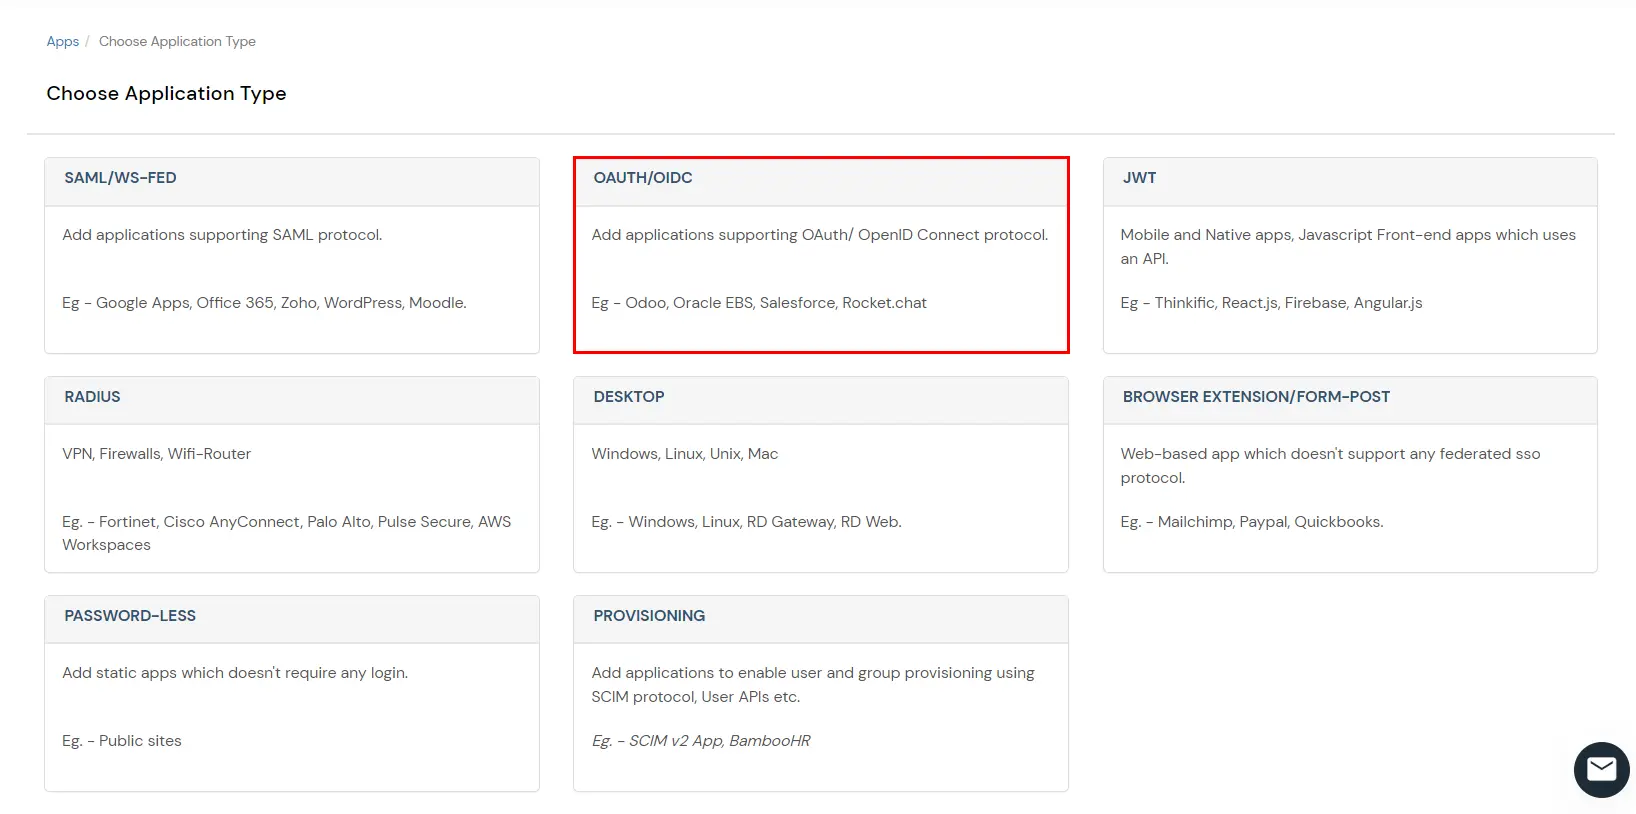
- In Choose Application Type click on Create App button in OAUTH/OIDC application type.
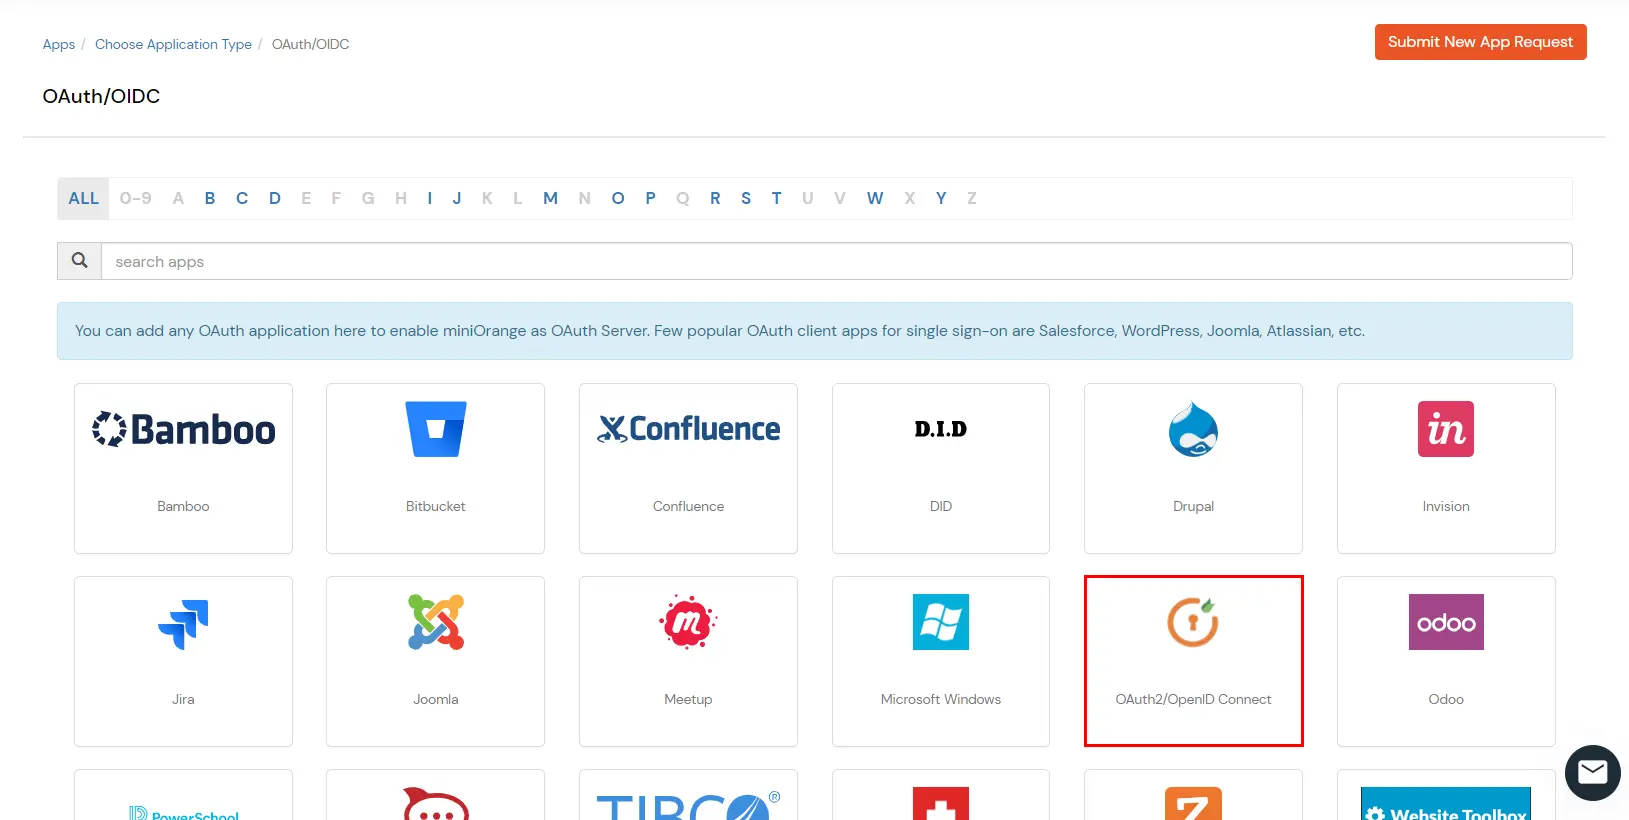
- Click on the 'OAuth2/OpenID Connect’ App Type.
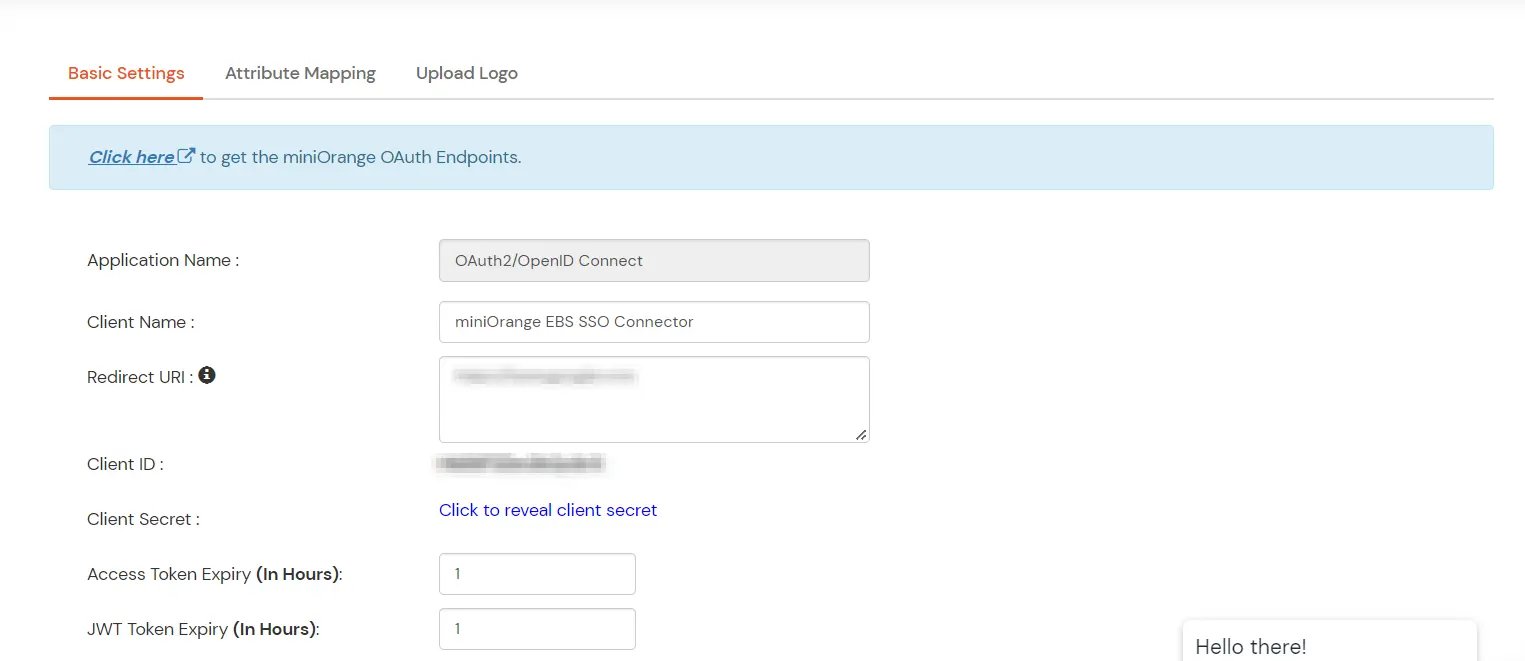
- Now enter any client name. Paste the Redirect URI which we have copied earlier when we were setting Oracle EBS SSO.
- In Primary Identity Provider choose your configured External Identity Provider.
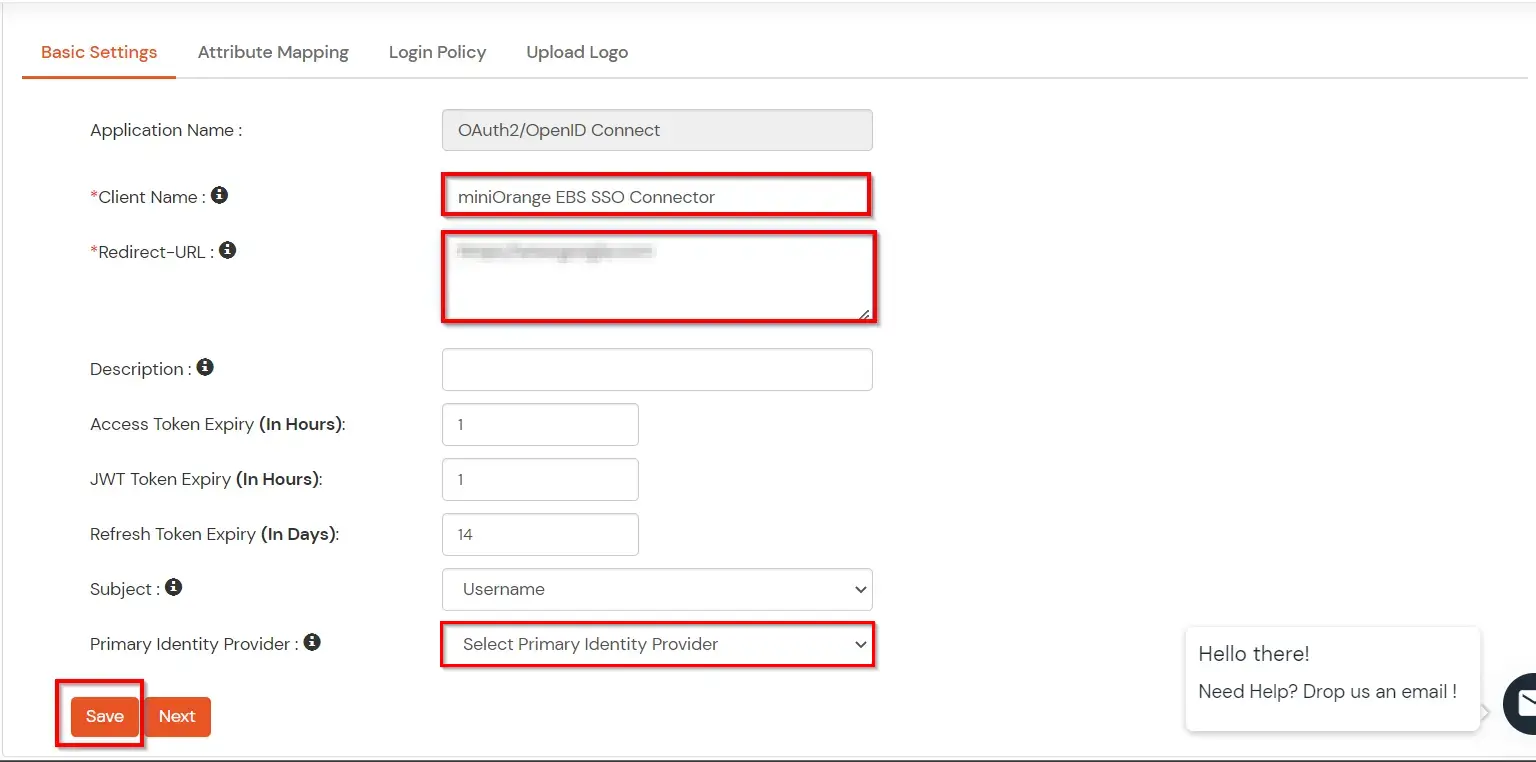
- Now click on Save Button to save the configuration of the application. After saving click on the select tab and choose edit option here.
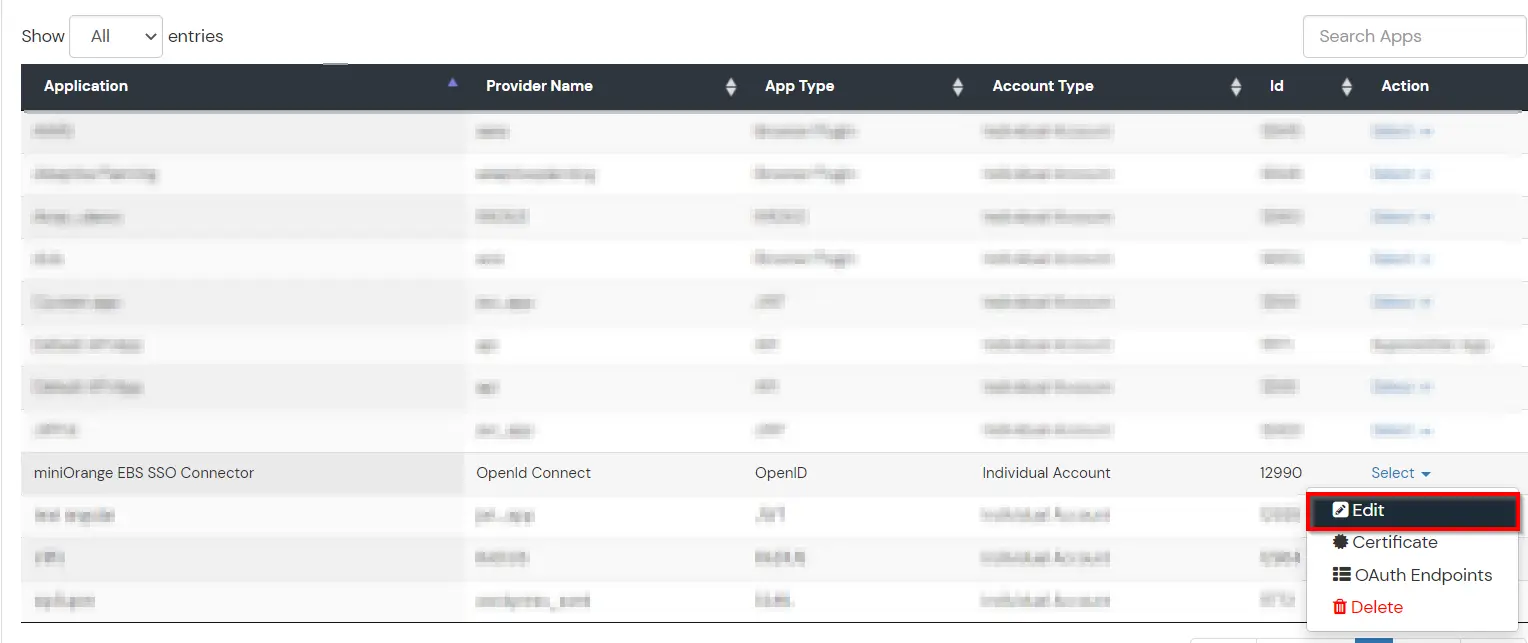
- Note down Client id and Client secret, you will need this info for configuring the miniOrange EBS SSO connector.
4. Setup miniOrange EBS SSO Connector Part-2
- Now go back to the miniorange EBS SSO Connector and do rest of the configuration.
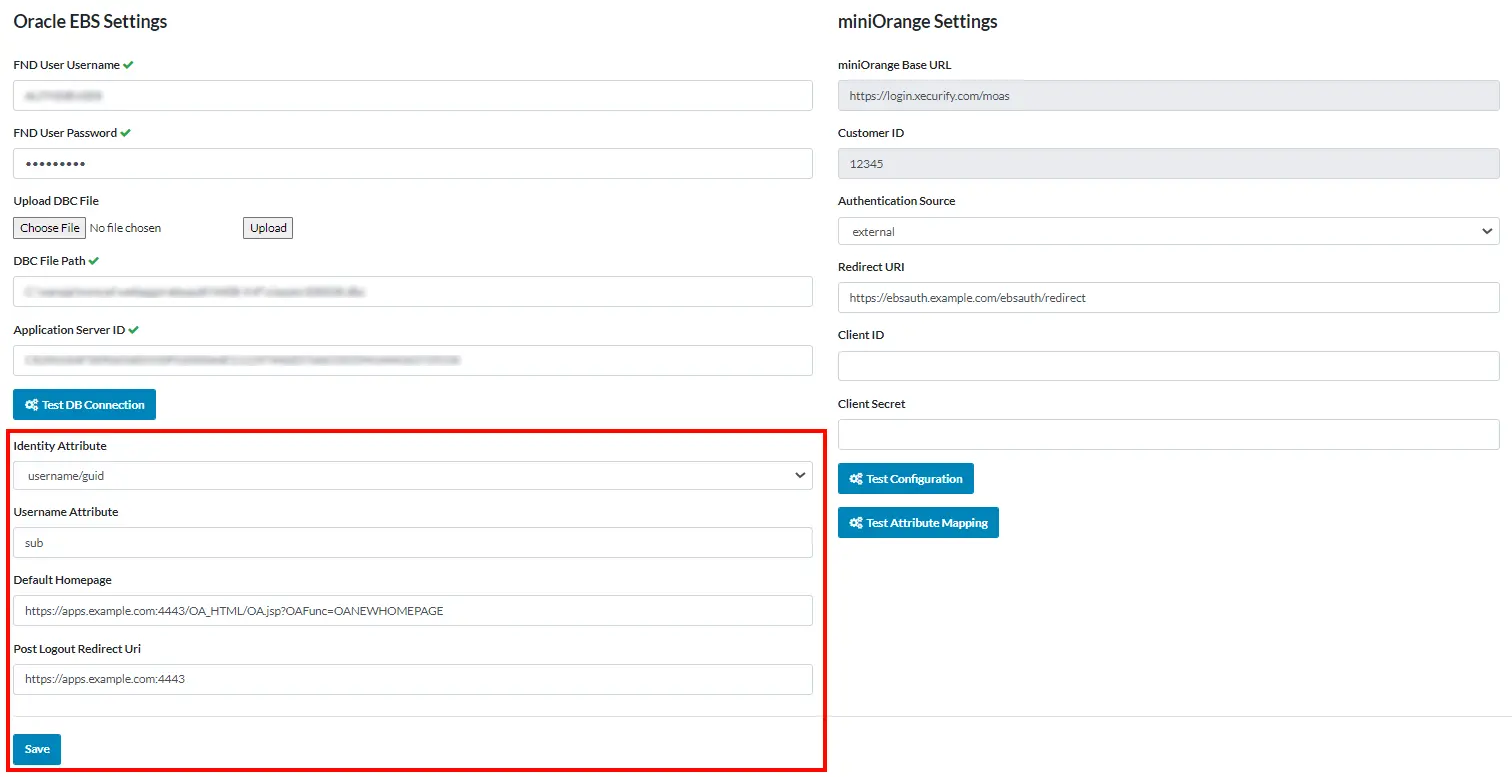
- In the Identity Attribute you have two choices: Either you can choose username/guid or email. If you choose username/guid attribute then username will be considered attribute for login and same with the email as well. Both username or email must be unique.
- Enter the following entities:
- Default Homepage URL :
https://apps.example.com:4443/OA_HTML/OA.jsp?OAFunc=OAHOMEPAGE
- Post Logout Redirect URI :
https://apps.example.com:4443
Here Default Homepage URL is the landing page where you will be redirected after login.
- miniOrange Base URL and Customer ID will be automatically fetched by the application itself.
In the Authentication Sources there are 3 choices: miniOrange, external and discovery.
| miniOrange |
When miniOrange is the Identity Provider |
| External |
When you have External Identity Provider |
| Discovery |
When you have multiple Identity Provider |
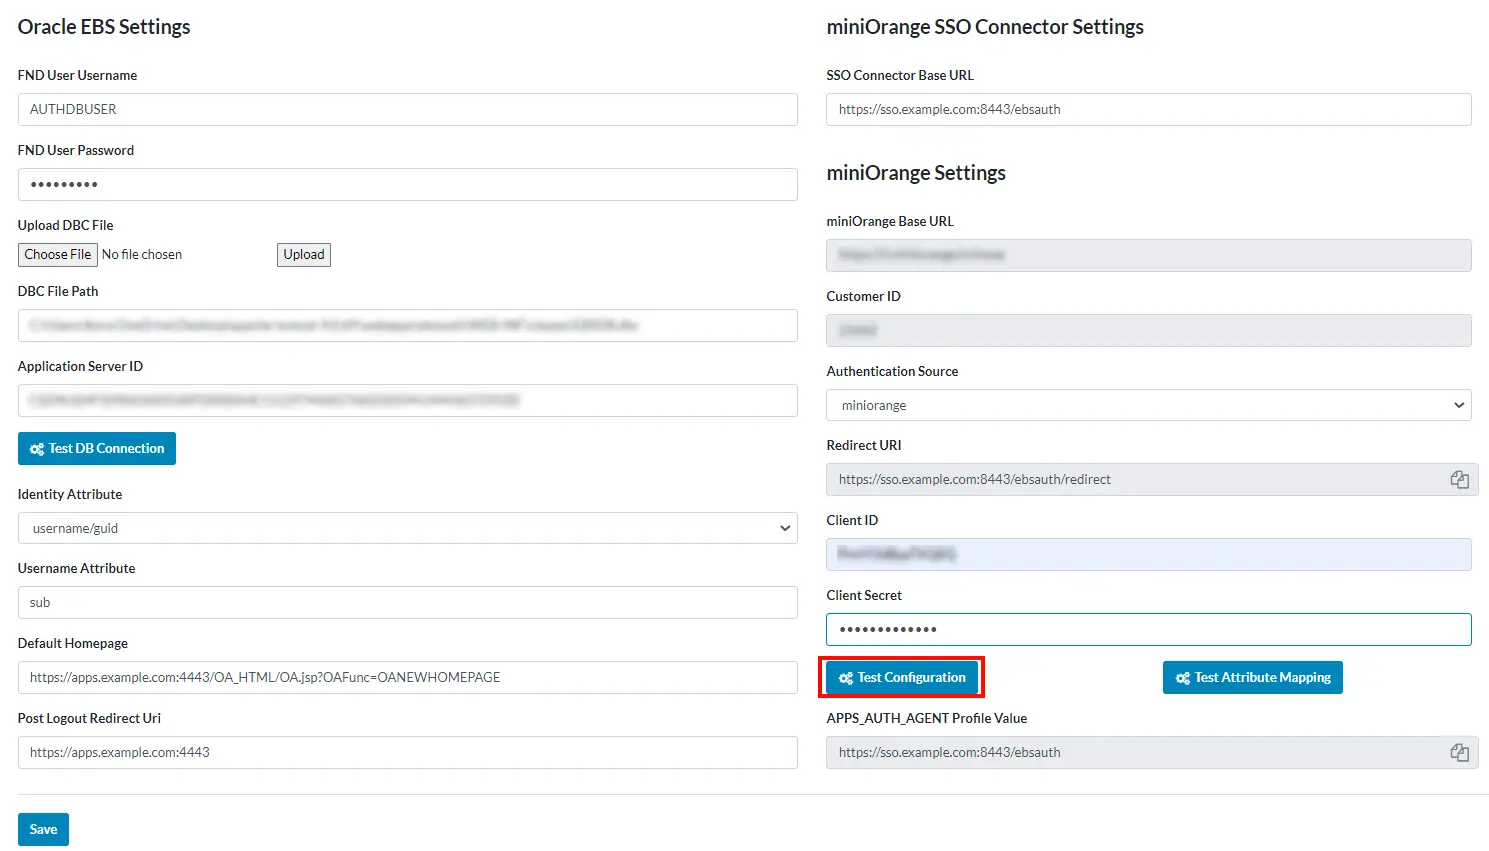
- Redirect URI will be fetched by the application itself.
- Paste Client ID and Client Secret here, that you have copied while setting the miniOrange Oauth application.
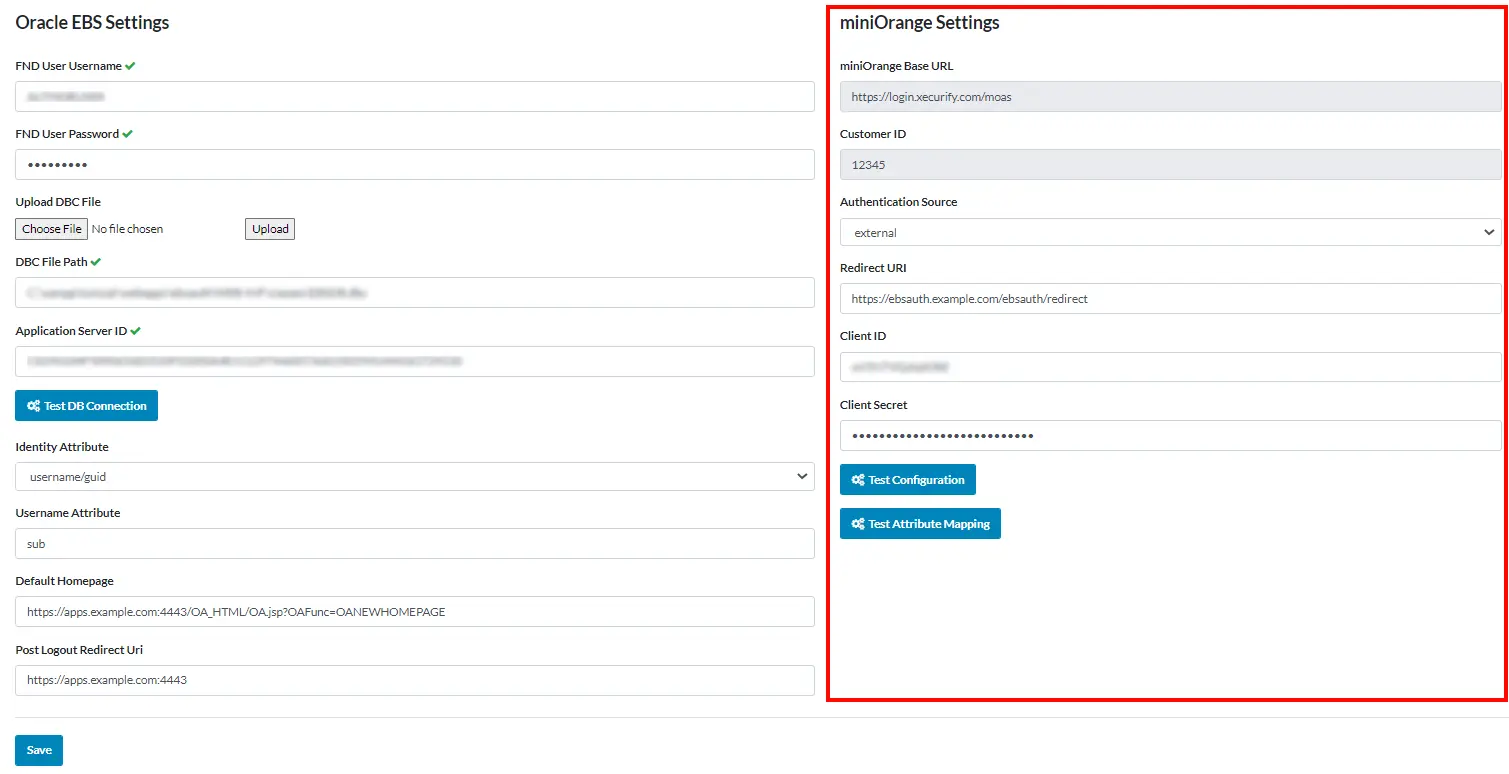
- After doing the configuration click on Save button to save the configuration. Now Click on Test Attribute Mapping to see the attribute mapping.
- Finally to test the whole configuration. Click on the Test Connection button.
5. Oracle EBS Azure AD Single Sign-On Integration
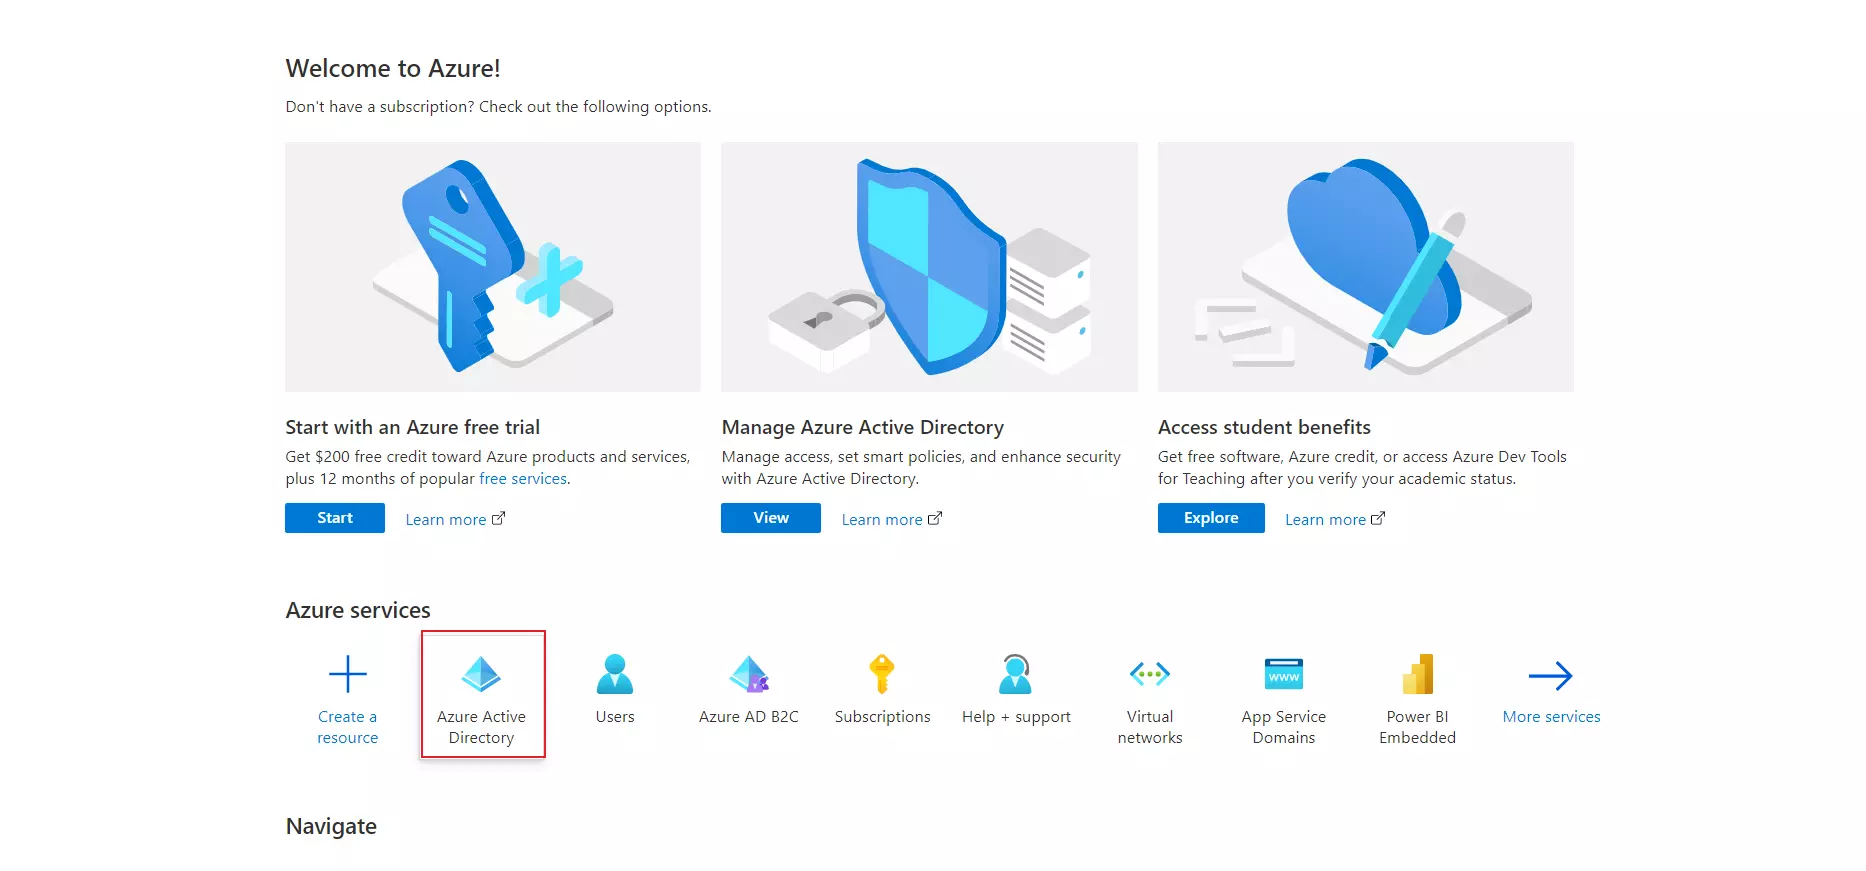
- Log in to Azure AD Portal
- Select Azure Active Directory.
- Select Enterprise Application.
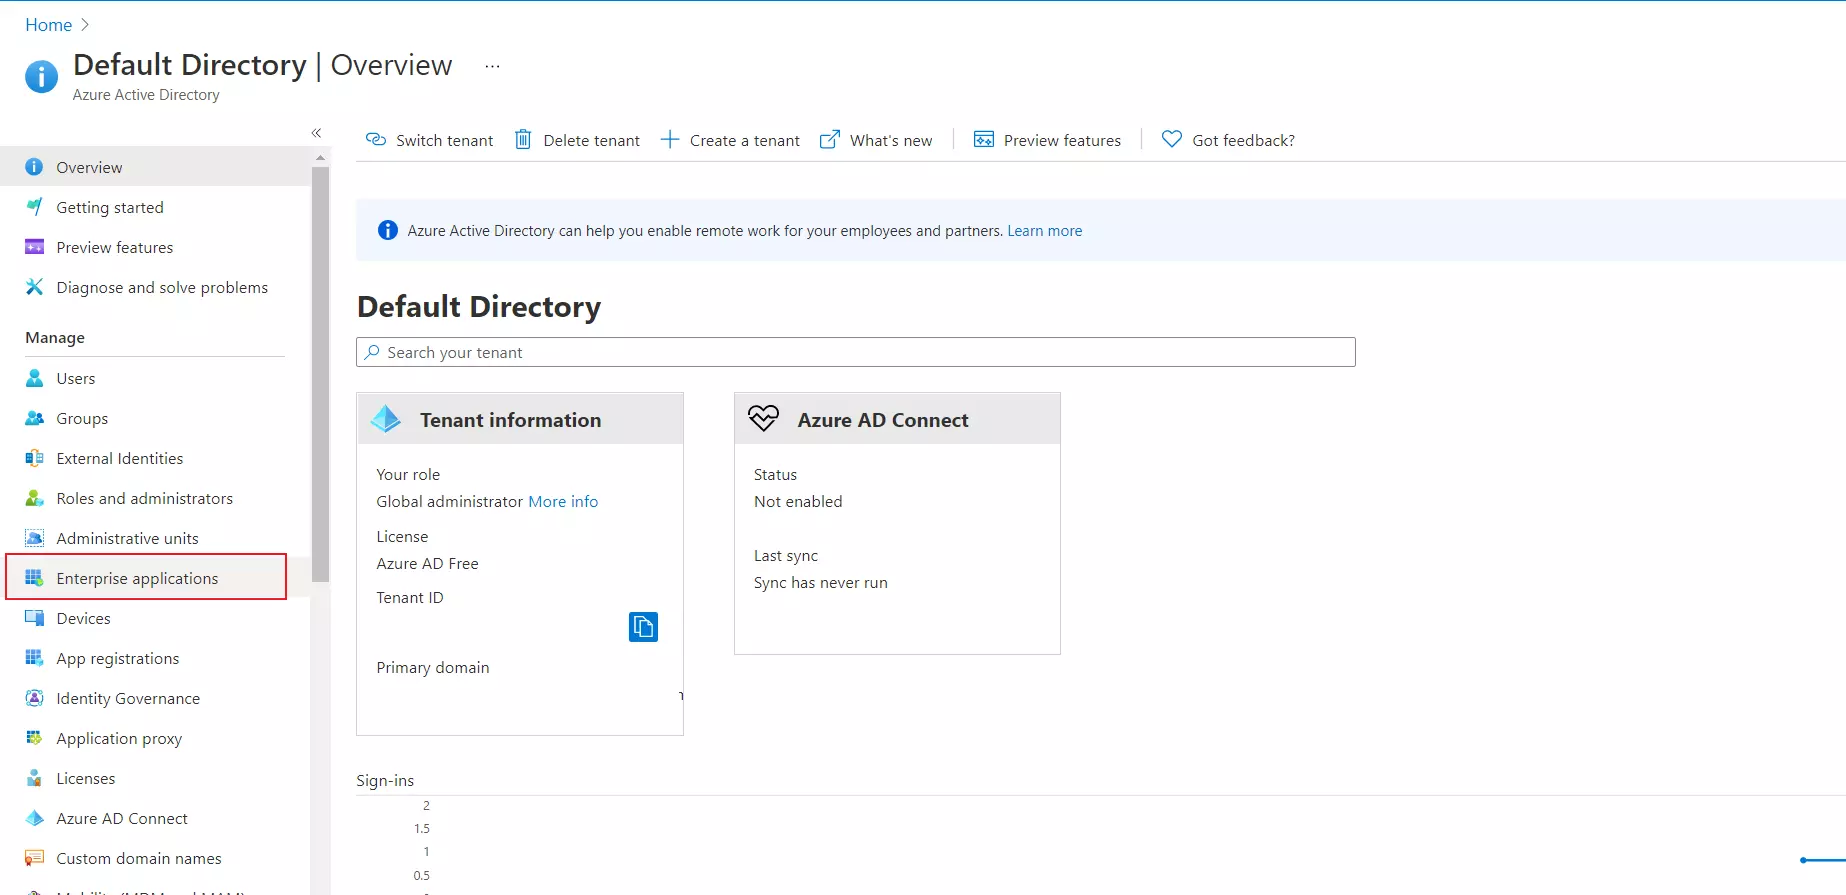
- Click on New Application.
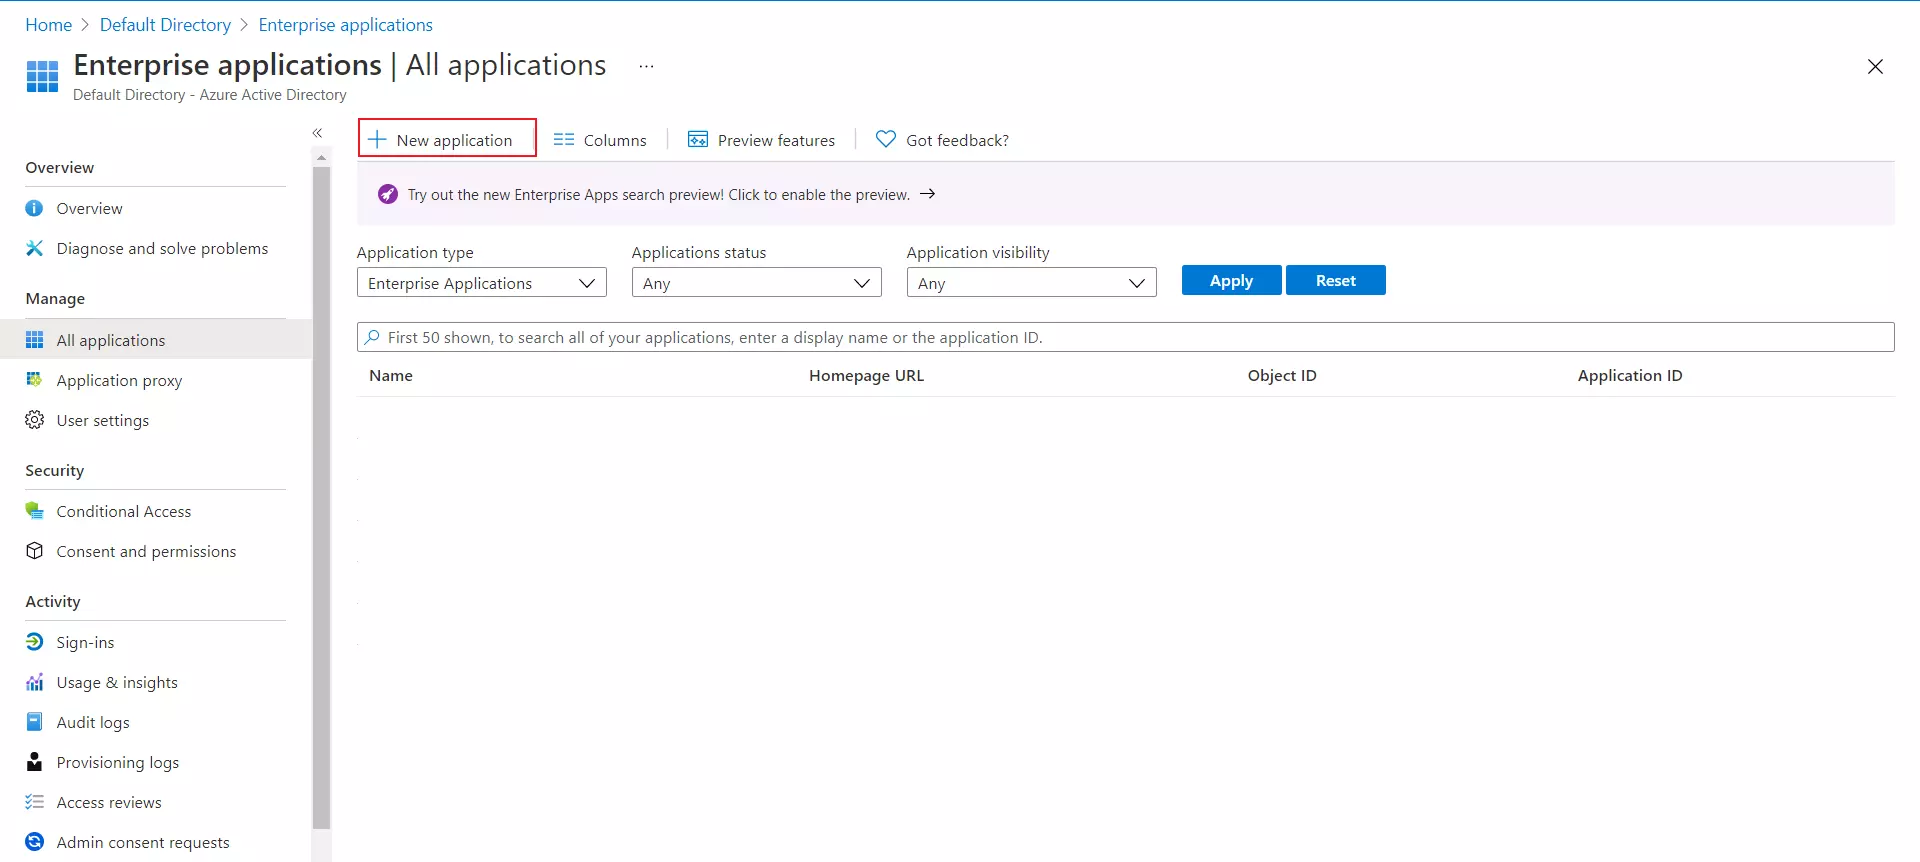
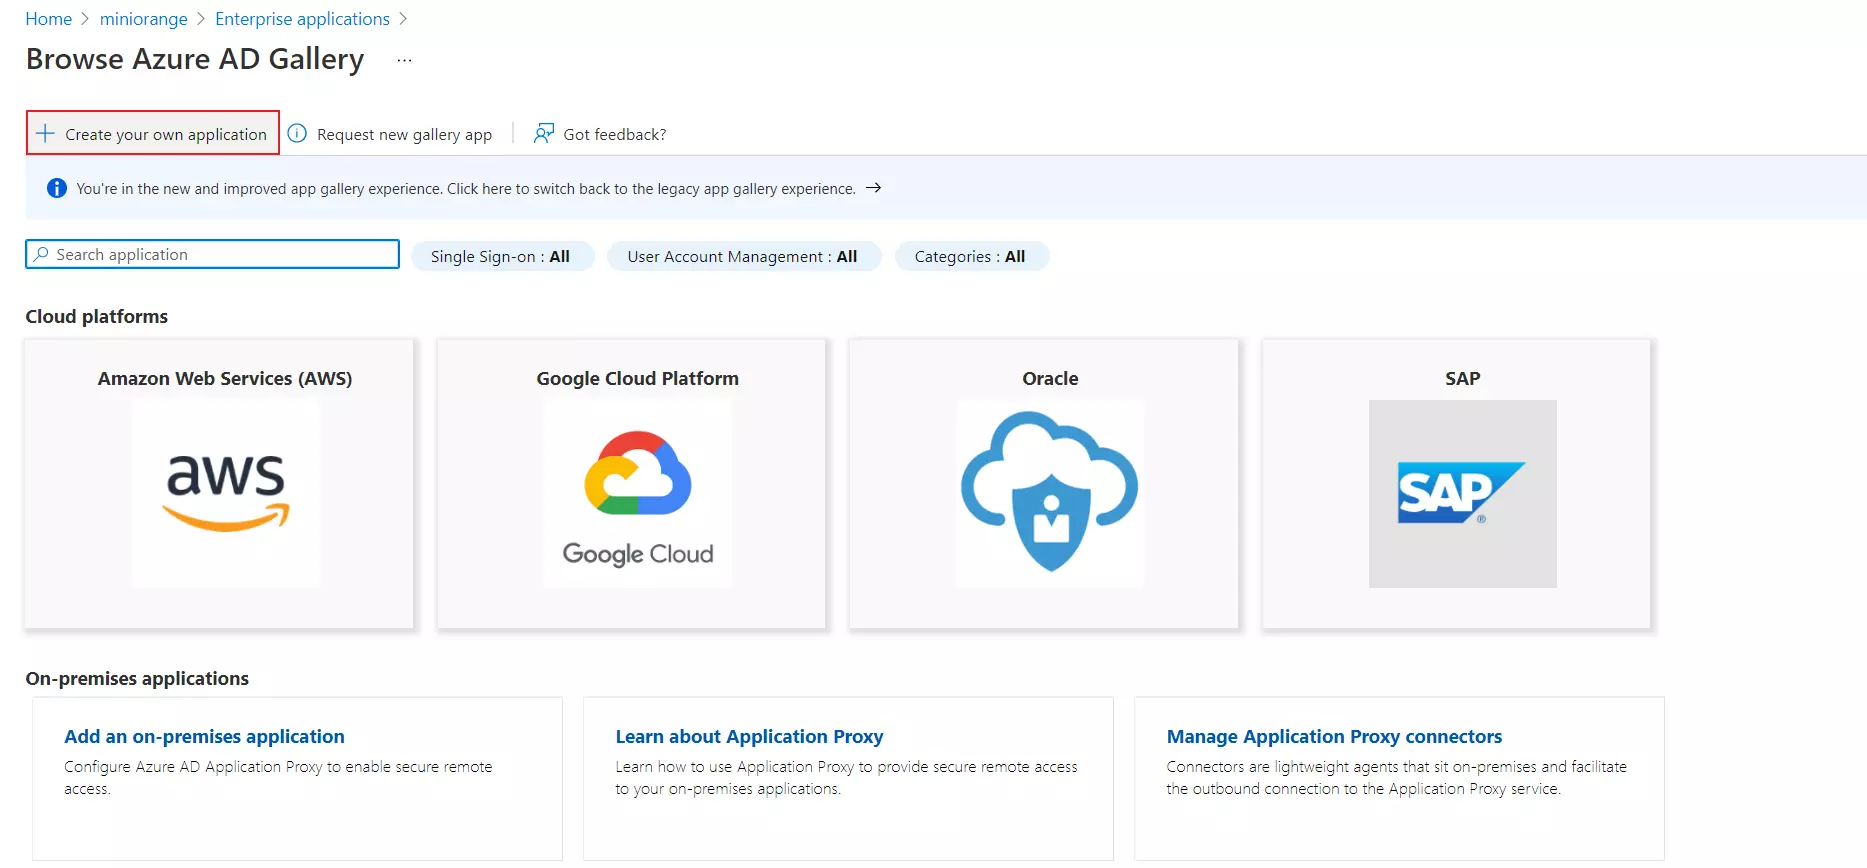
- Click on Create your own Application under Browse Azure AD Gallery.
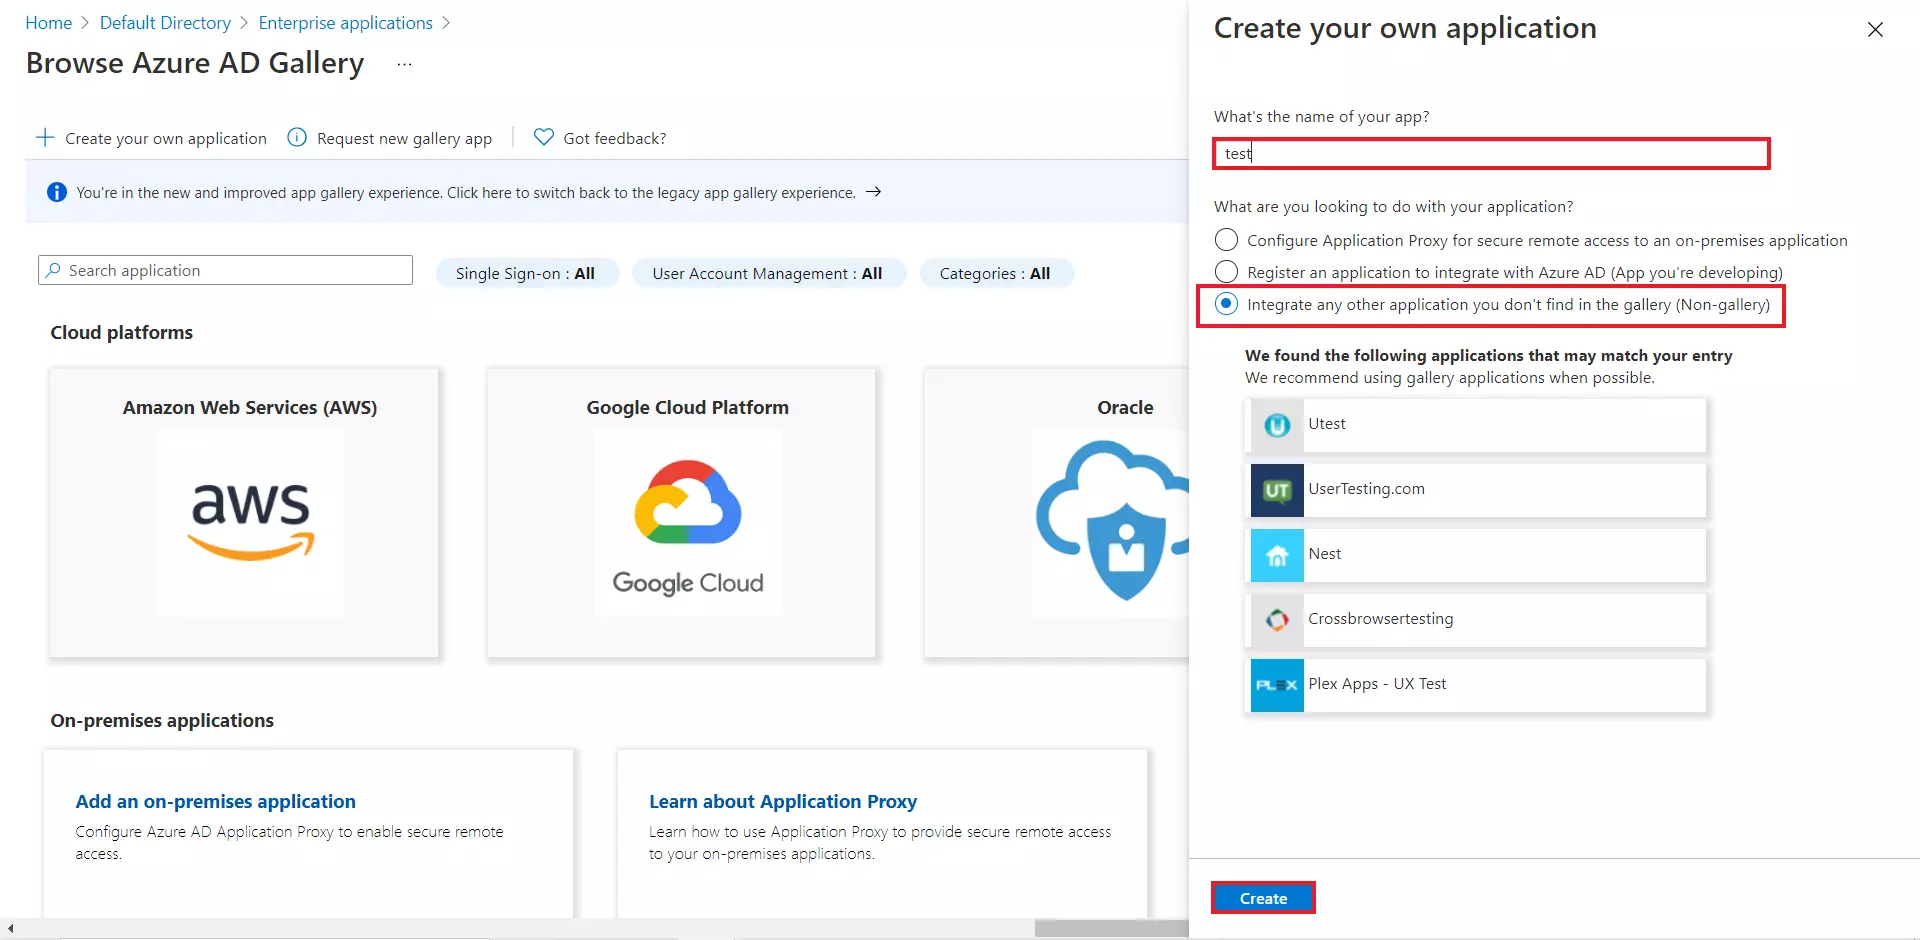
- Enter the name for your app, then select Non-gallery application section and click on Create button.
- Click on Setup Single Sign-On .
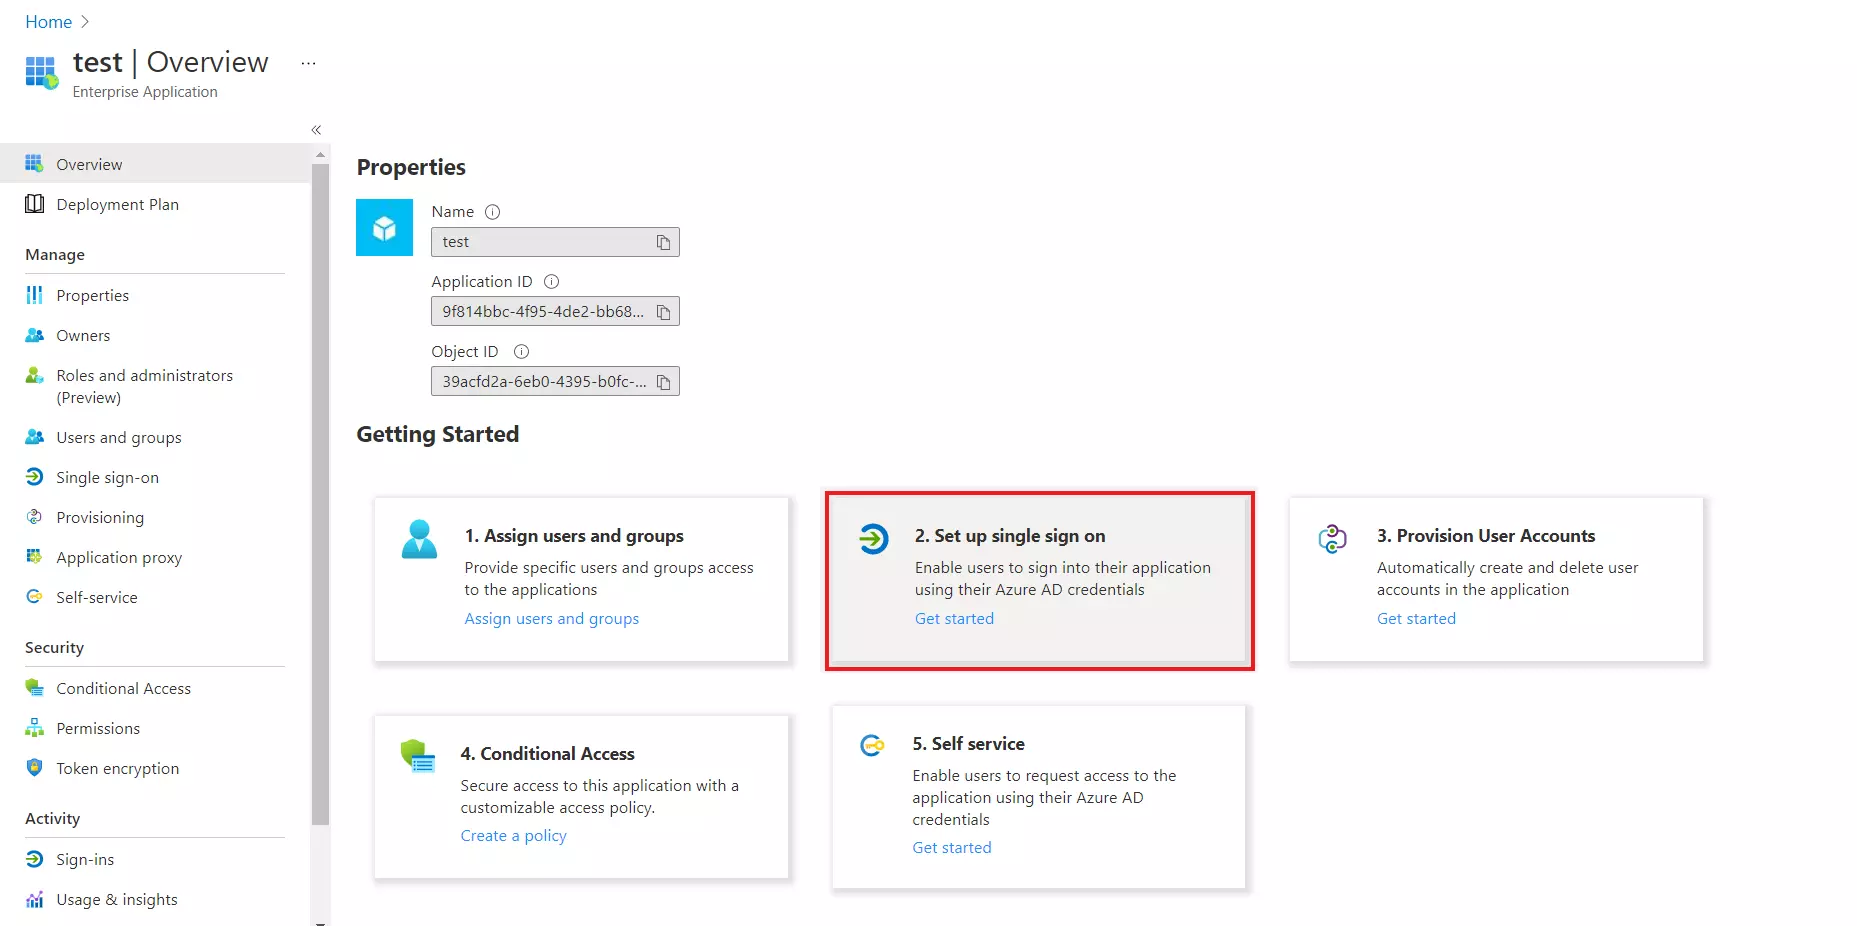
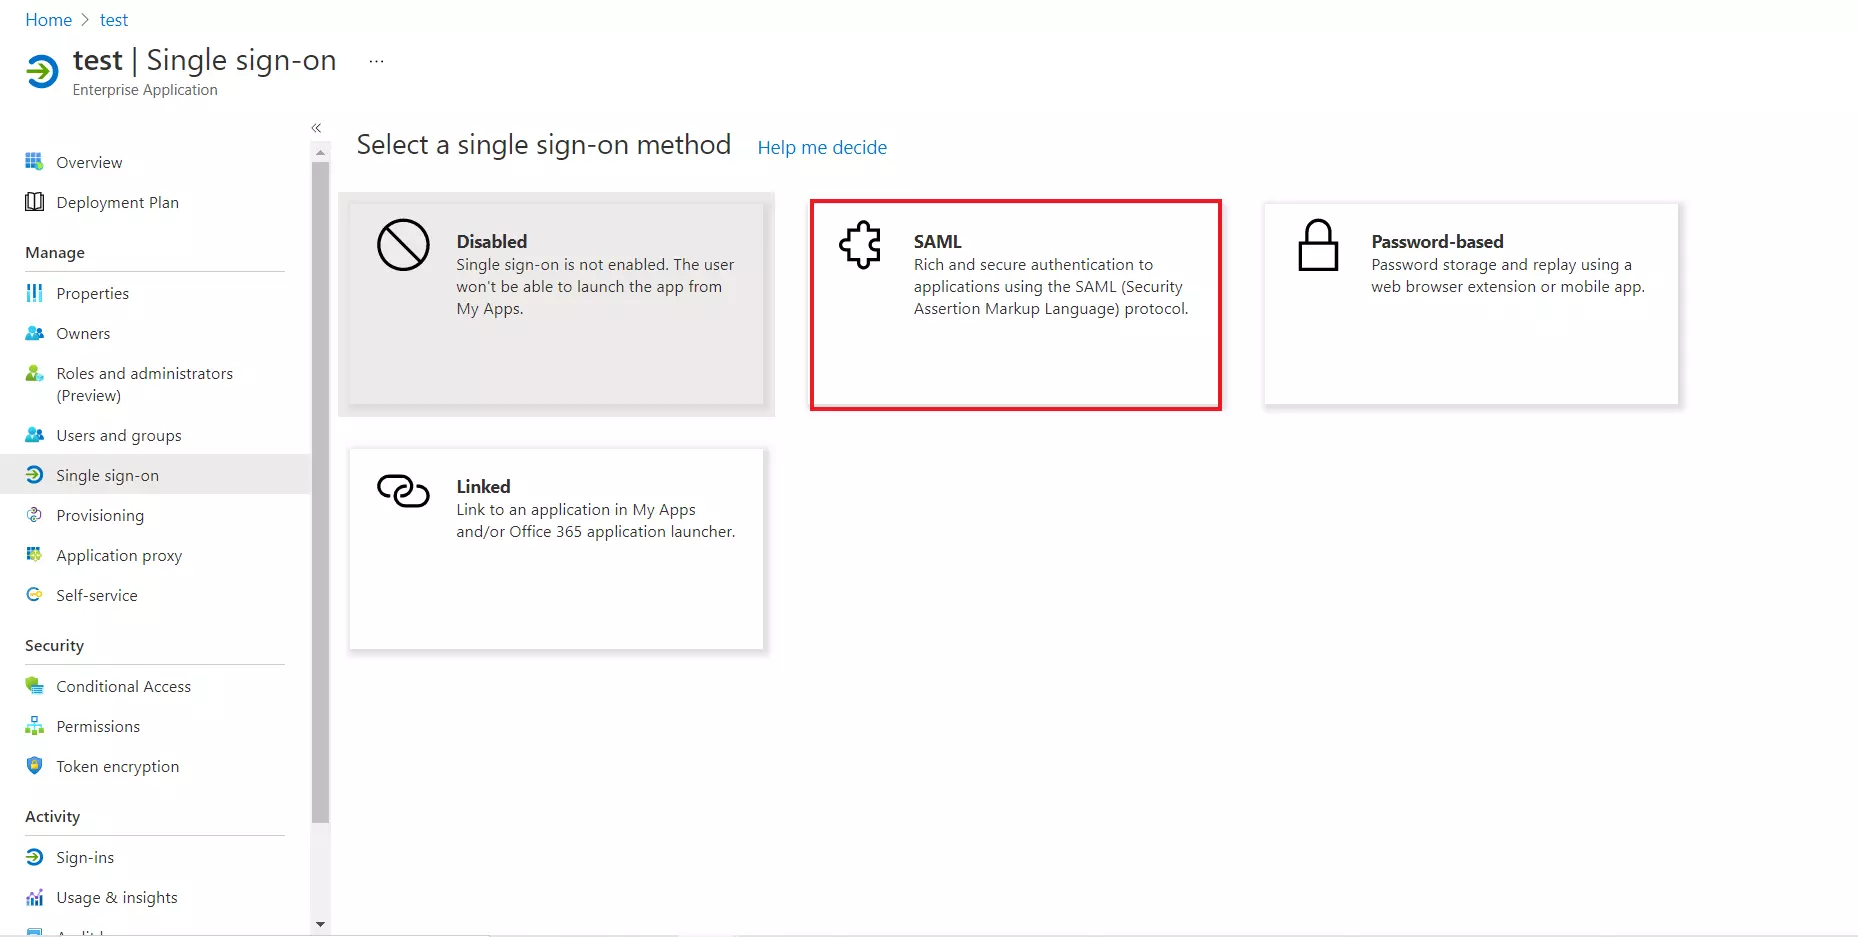
- Select the SAML tab.
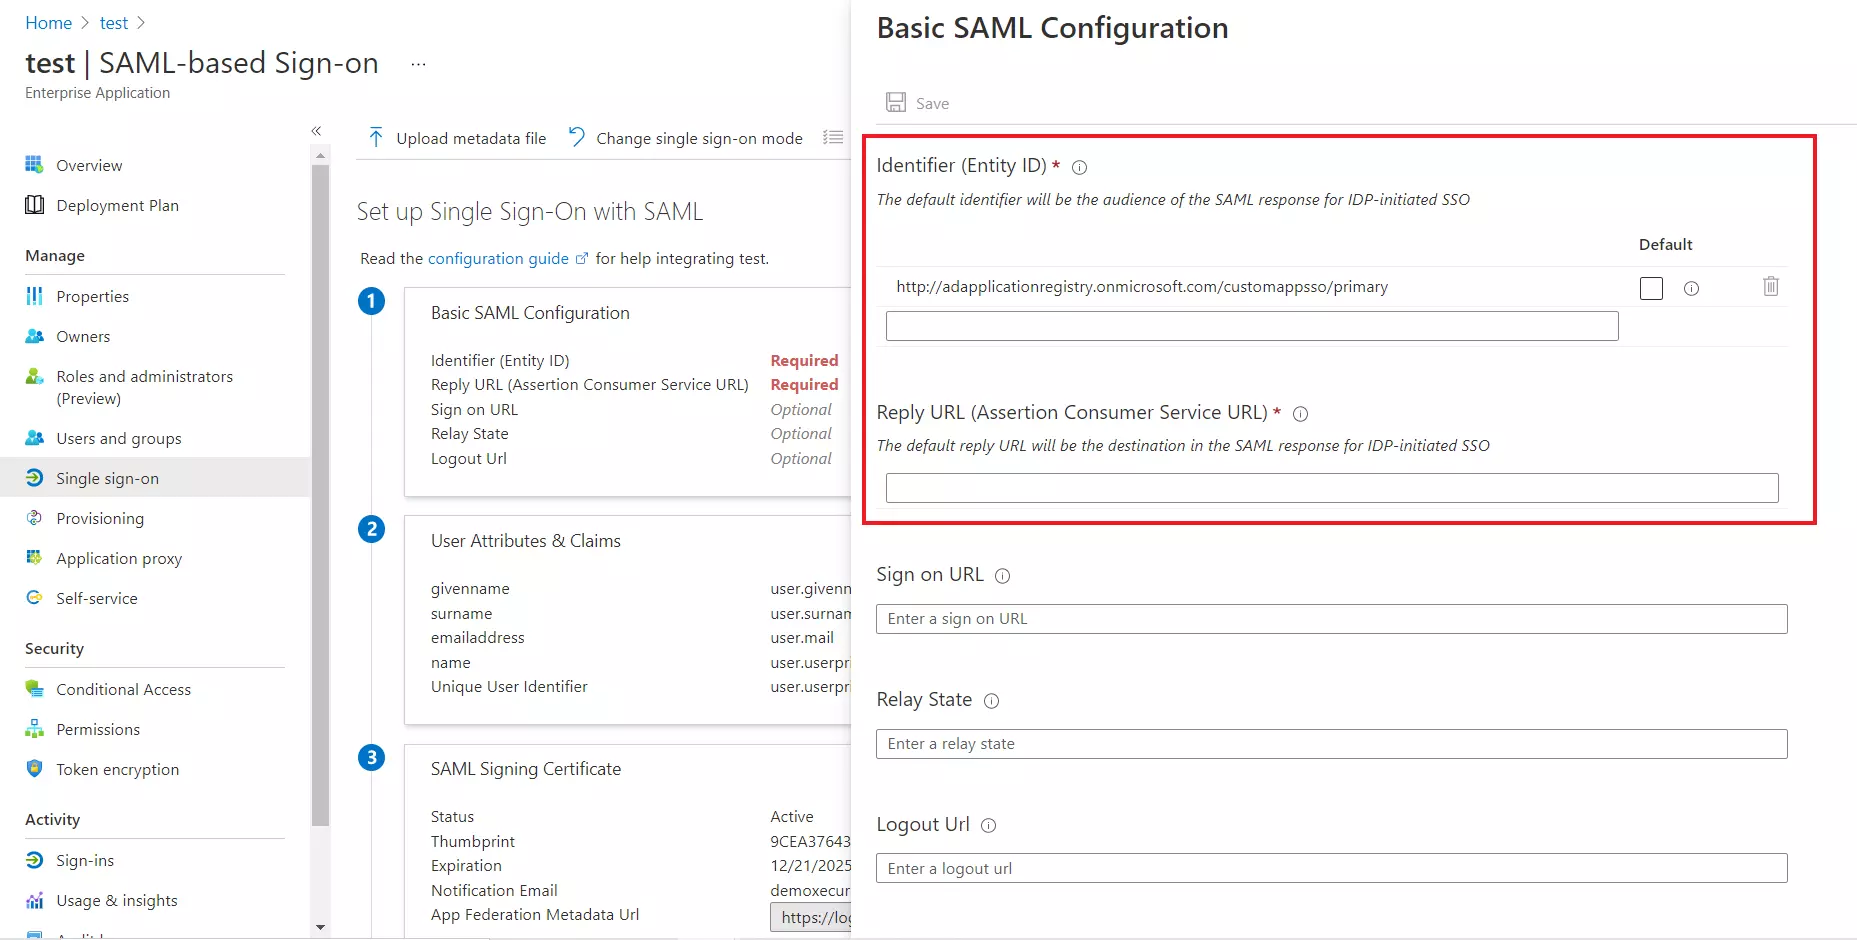
- For Basic SAML configuration you need to get the Entity ID, ACS URL, and the Single Logout URL from miniOrange.(available in next step)
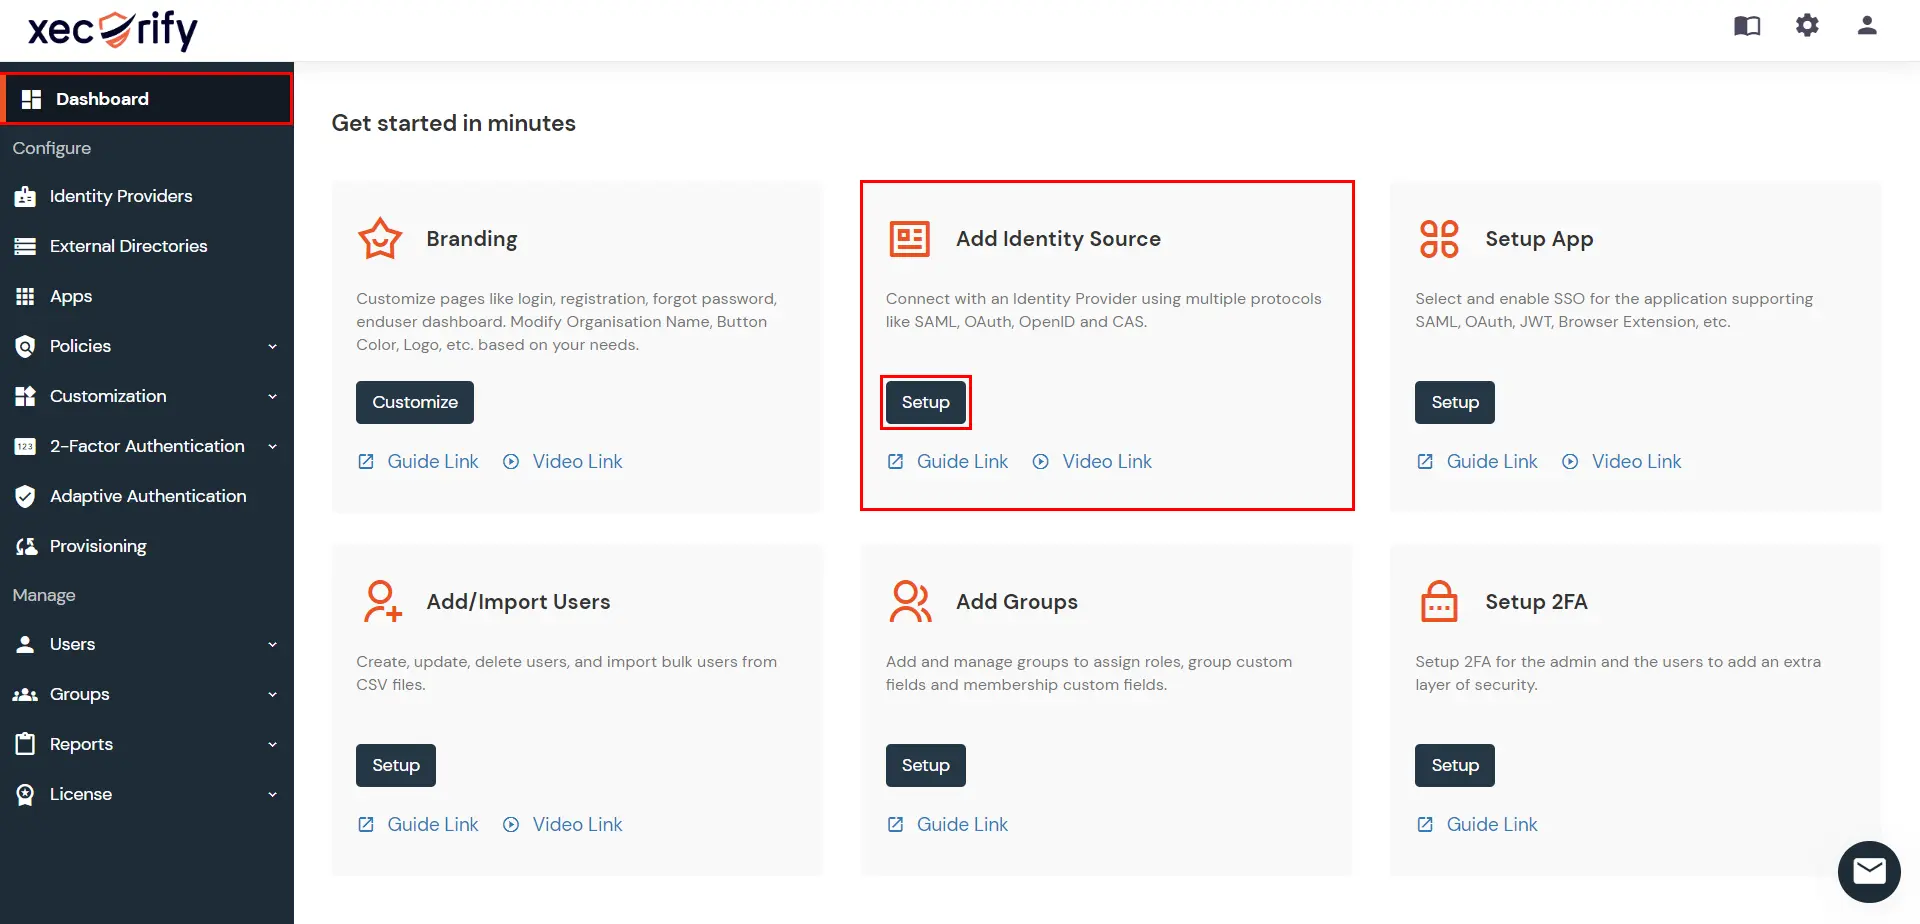
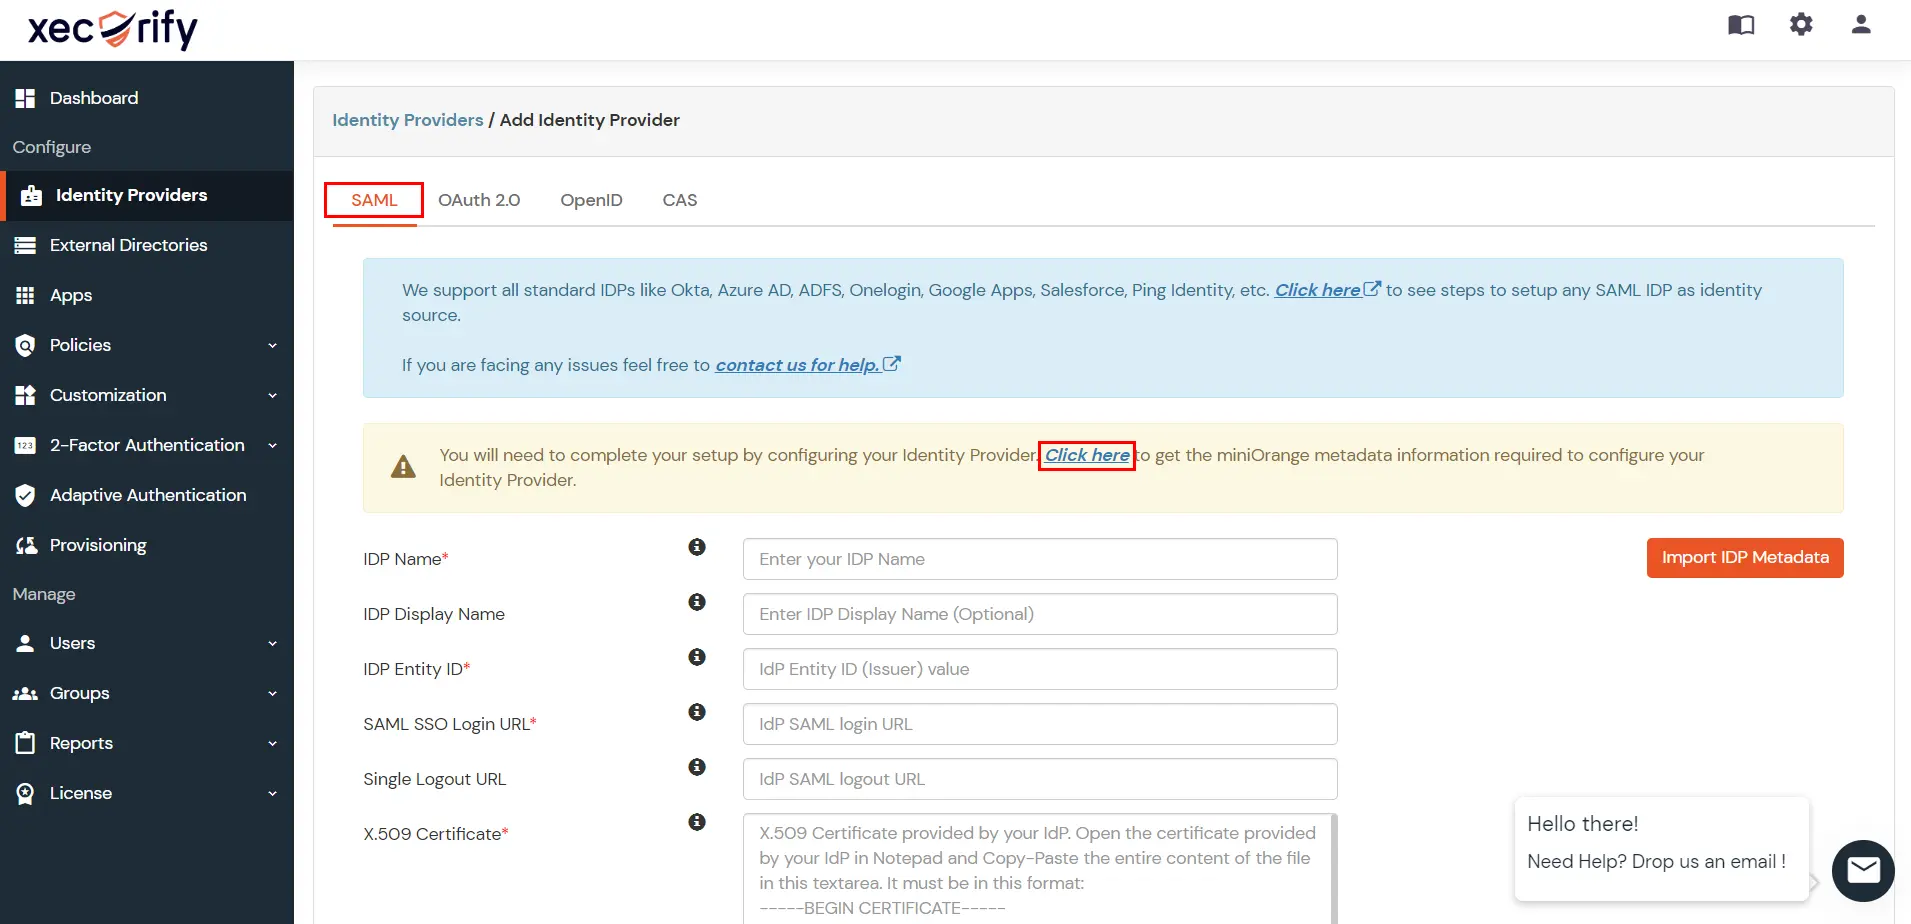
- Go to miniOrange Dashboard. Under Add Identity Source, click on Setup >> Add IDP
- Now click on the Click here link to get miniOrange metadata as shown in Screen below.
- For SP -INITIATED SSO section Select Show Metadata Details.
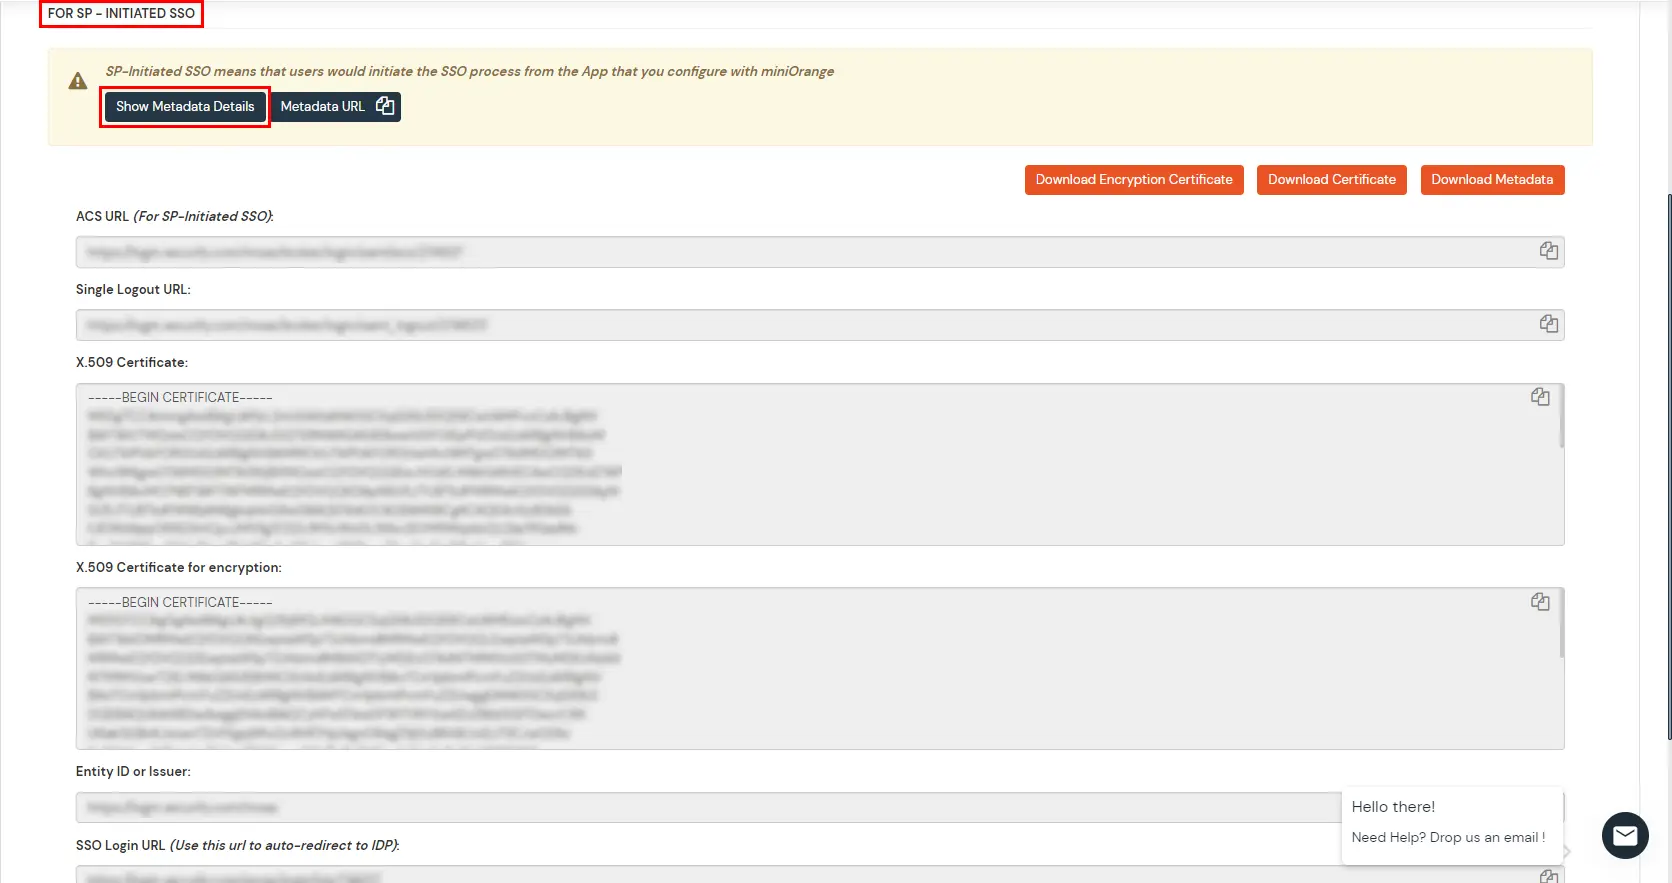
- Enter the values in basic SAML configuration as shown in below screen:
- Identifier (Entity ID) :
Entity ID or Issuer
- Reply URL (Assertion Consumer Service URL) :
ACS URL
- Sign on URL (optional required during IDP-initiated SSO) :
SSO Login URL
- Logout URL :
Single Logout URL
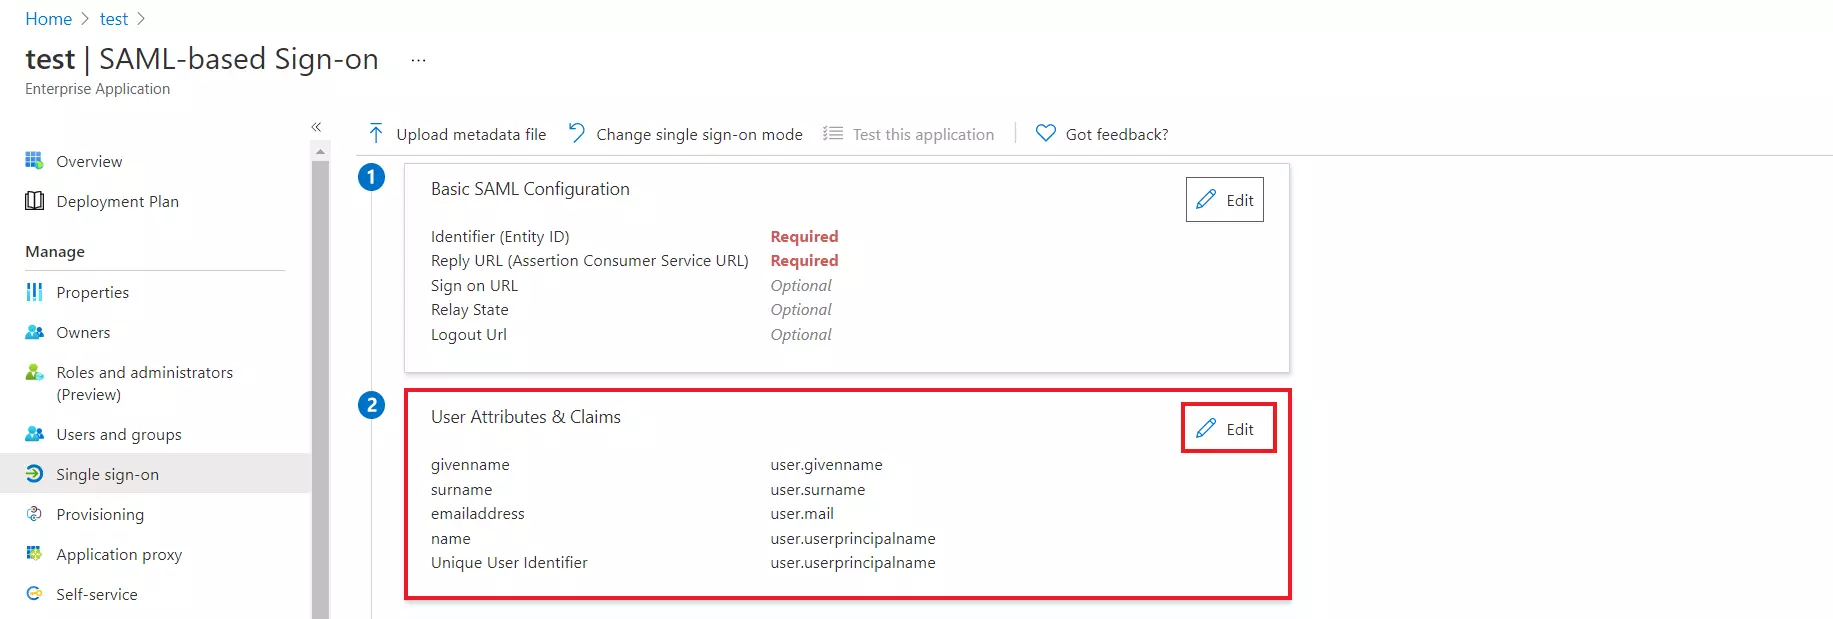
- By default, the following Attributes will be sent in the SAML response. You can view or edit the claims sent in the SAML response to the application under the Attributes tab.
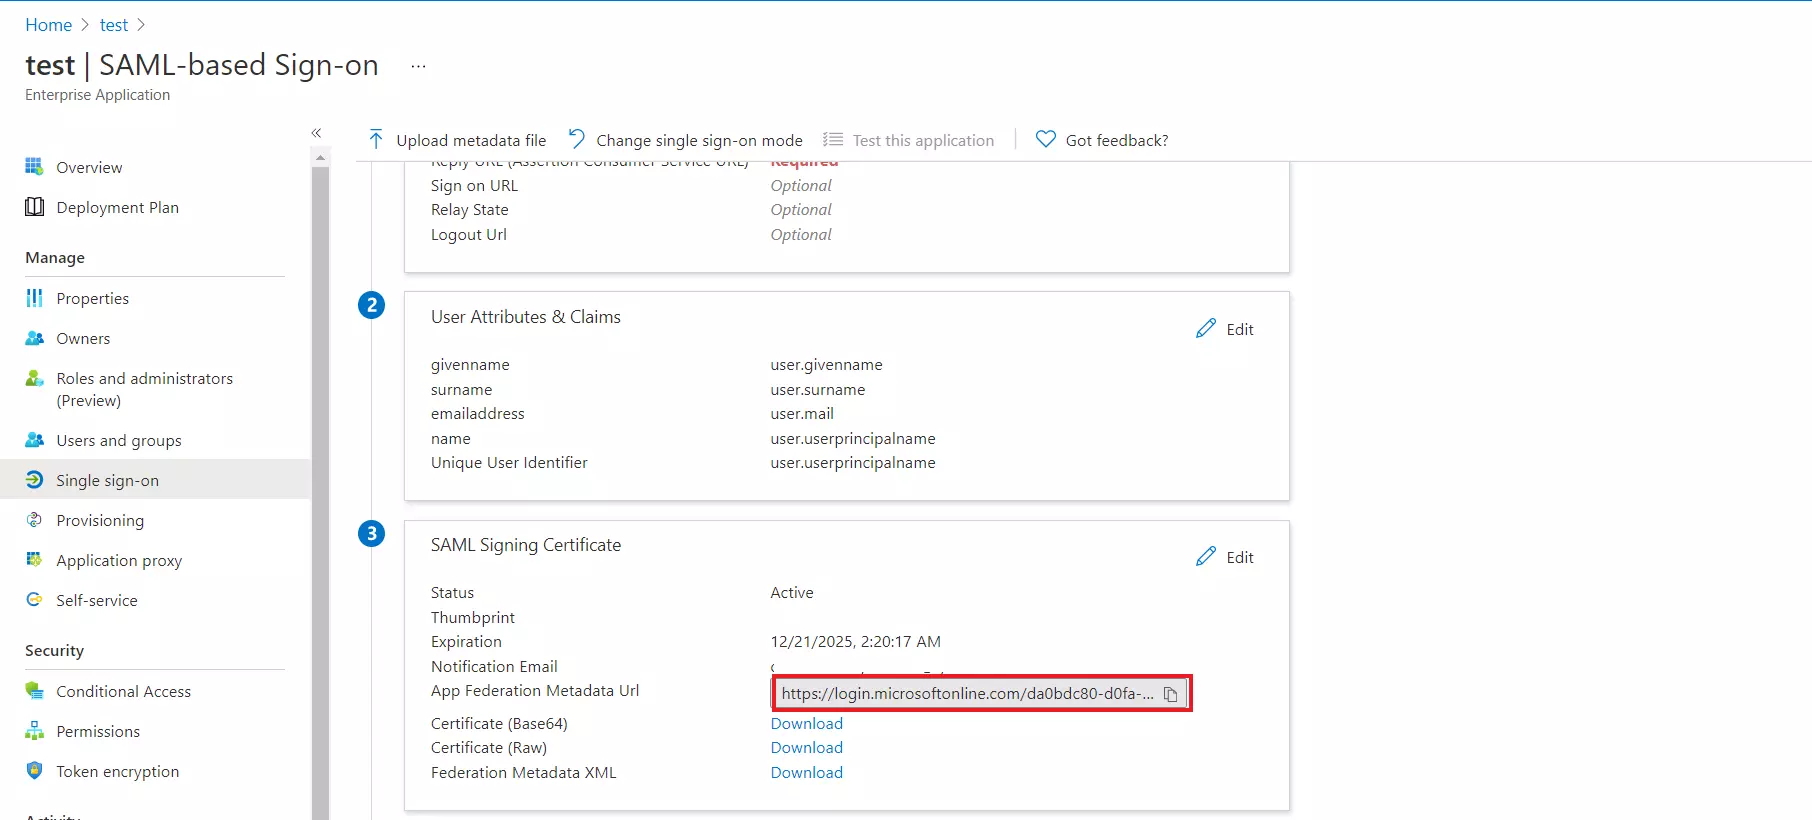
- Copy the App Federation Metadata Url to get the Endpoints required for configuring your Service Provider in step 2.
- Assign users and groups to your SAML application.
- As a security control, Azure AD will not issue a token allowing a user to sign in to the application unless Azure AD has granted access to the user. Users may be granted access directly, or through group membership.
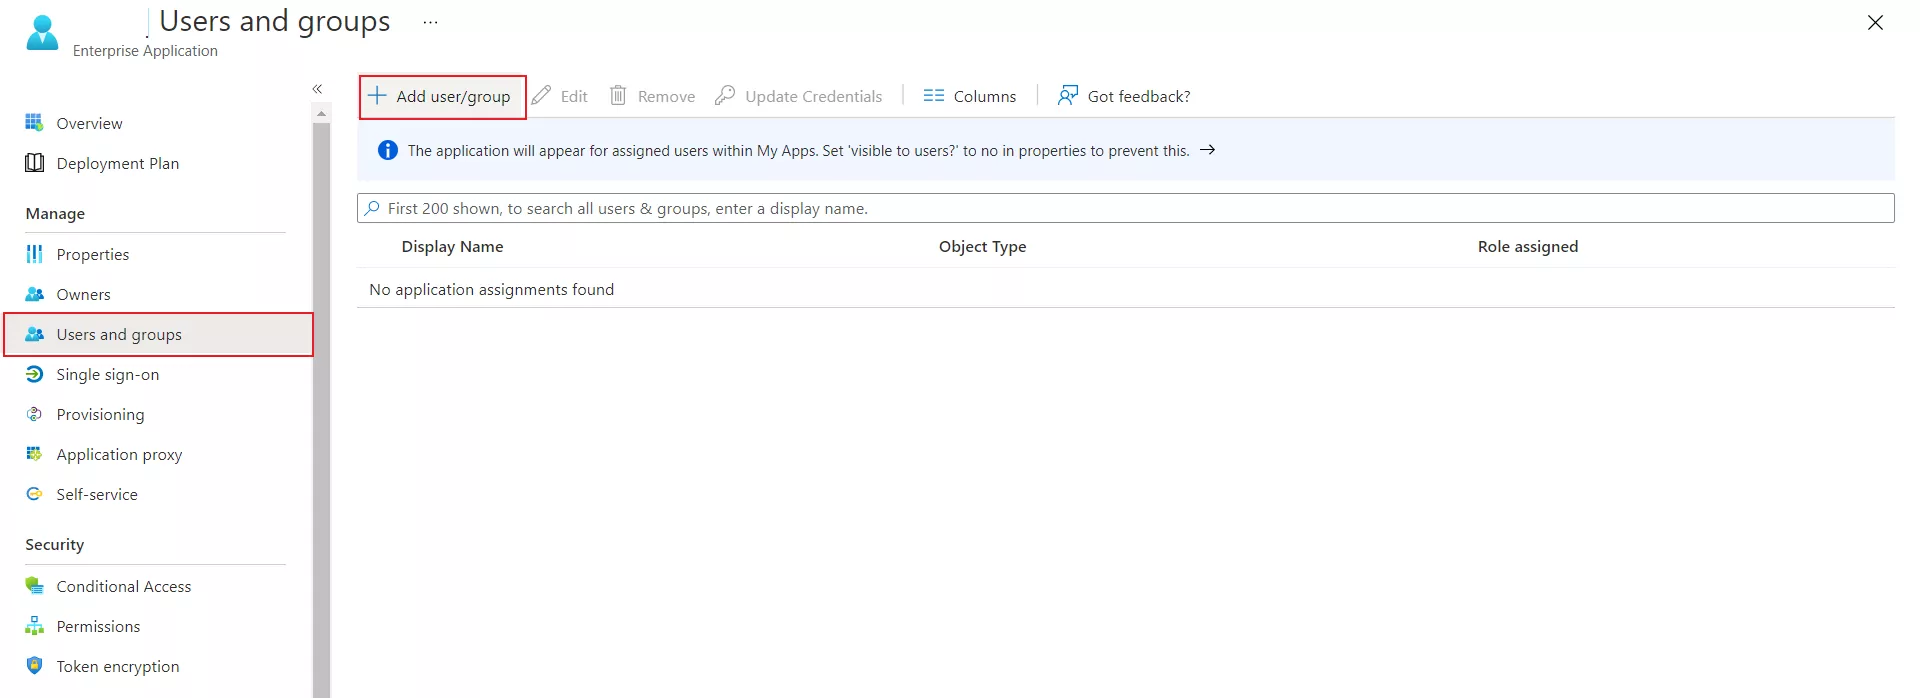
- Navigate to Users and groups tab and click on Add user/group.
- Click on Users to assign the required user and then click on select.
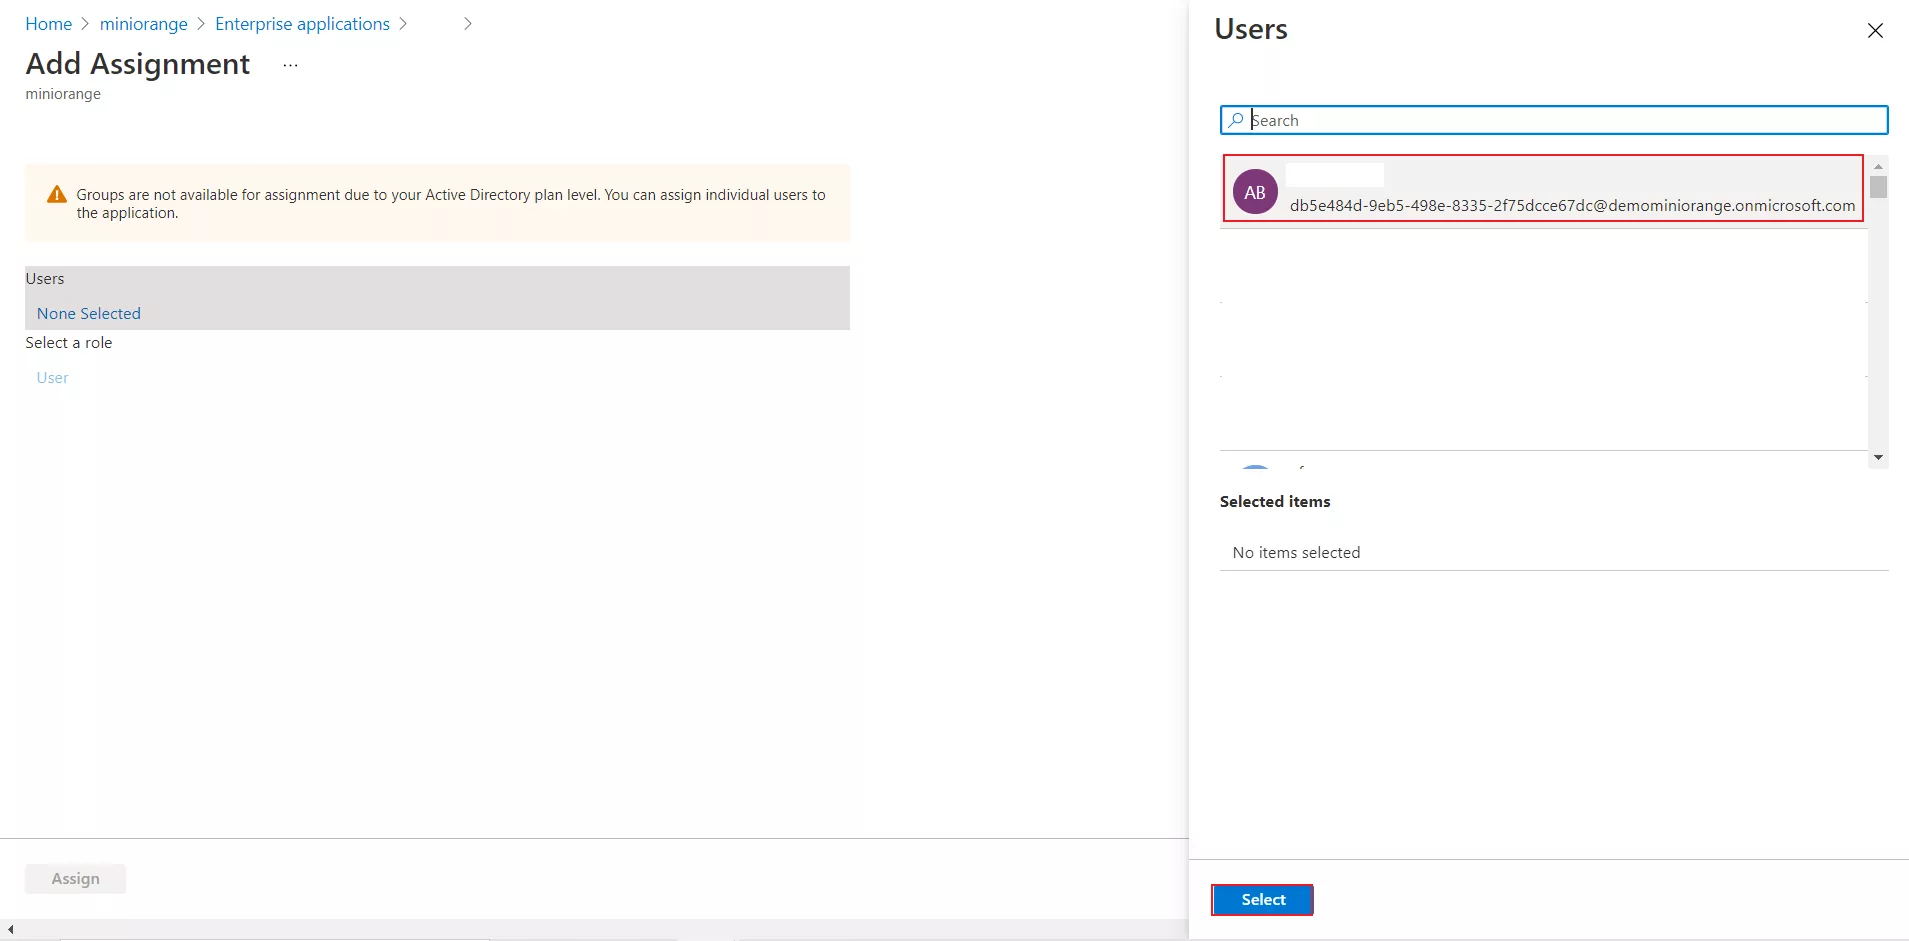
- You can also assign a role to your application under Select Role section. Finally, click on Assign button to assign that user or group to the SAML application. Your configuration is Azure AD is done.
6. Configure Active Directory as a SAML Identity Provider in the miniOrange Broker Agent
- Go to miniOrange Admin Console.
- From the left navigation bar select Identity Provider
- Click on Add Identity Provider button.

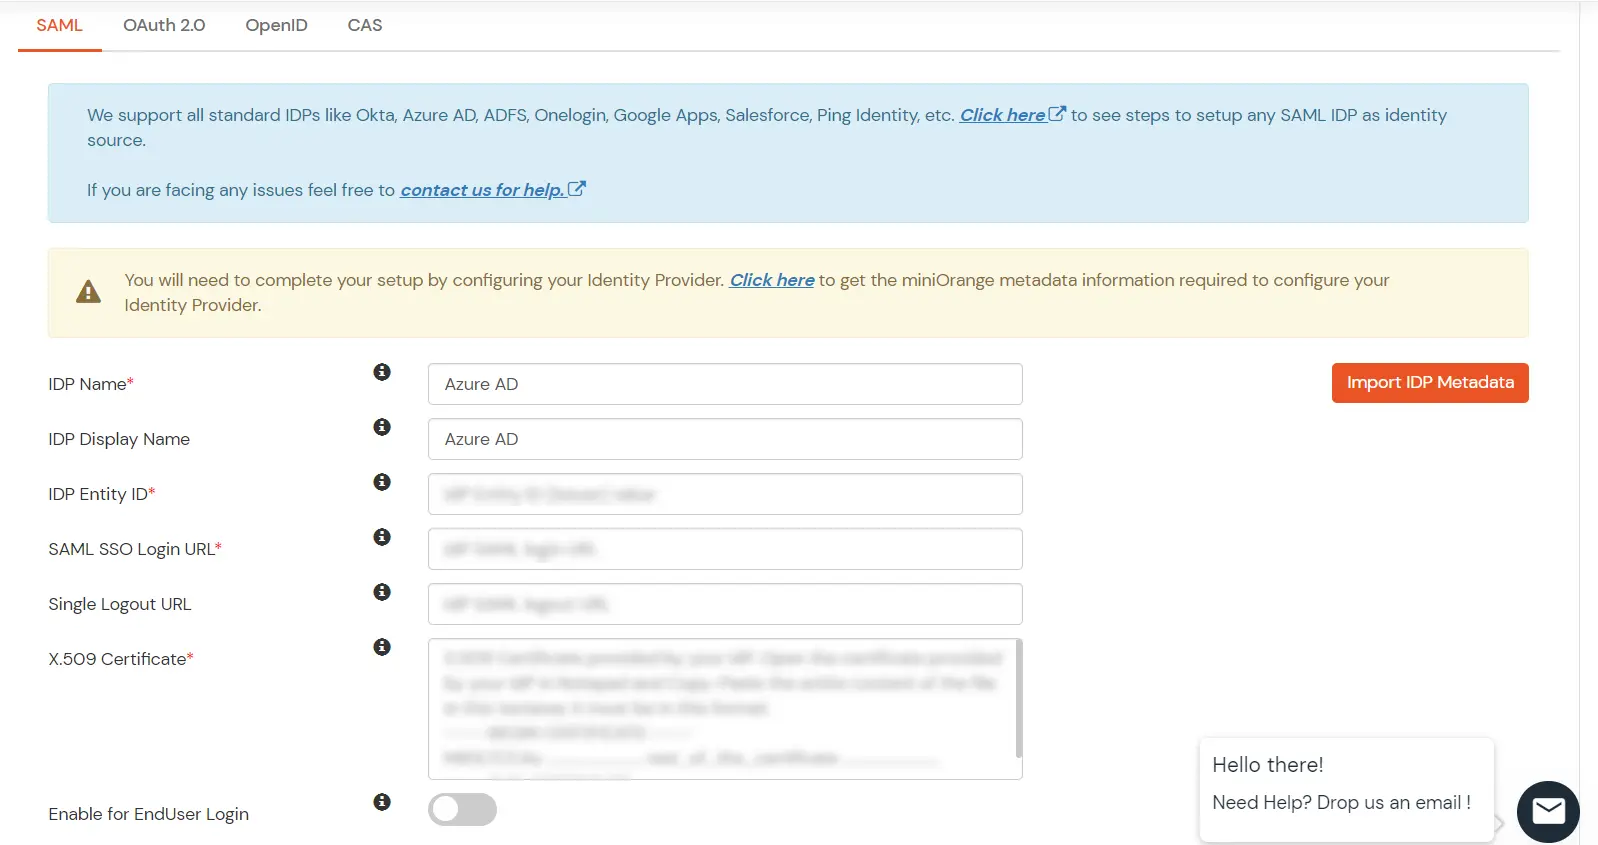
- Select SAML. Click on Import IDP metadata.
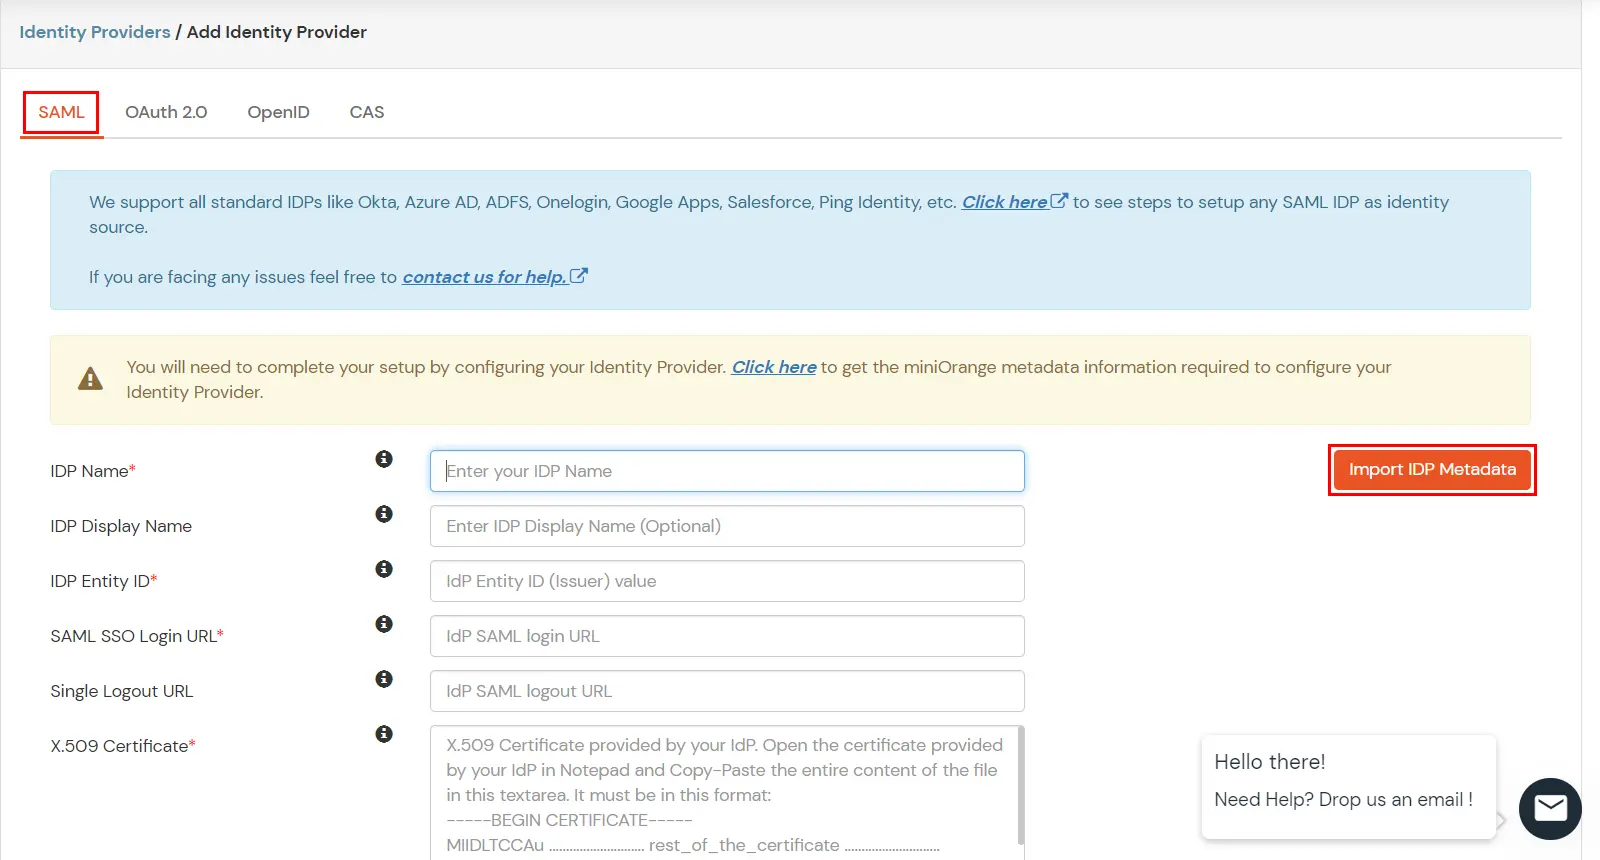
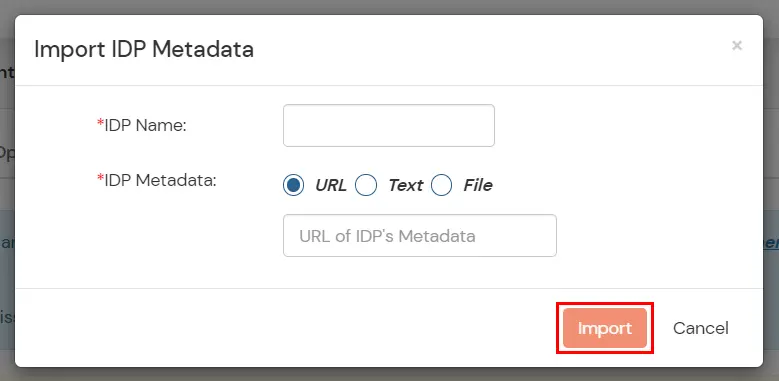
- Choose appropriate IDP name.
- The metadata URL is available in Above step. Choose URL and copy the metadata URL.
- Click on Import.
- As shown in the below screen the IDP Entity ID, SAML SSO Login URL, Single Logout URL and x.509 Certificate will be auto filled from the file imported.
- Click on Save.
7. Test IdP-initiated Oracle EBS SSO
- Click on The Test Connection button to test the configuration.
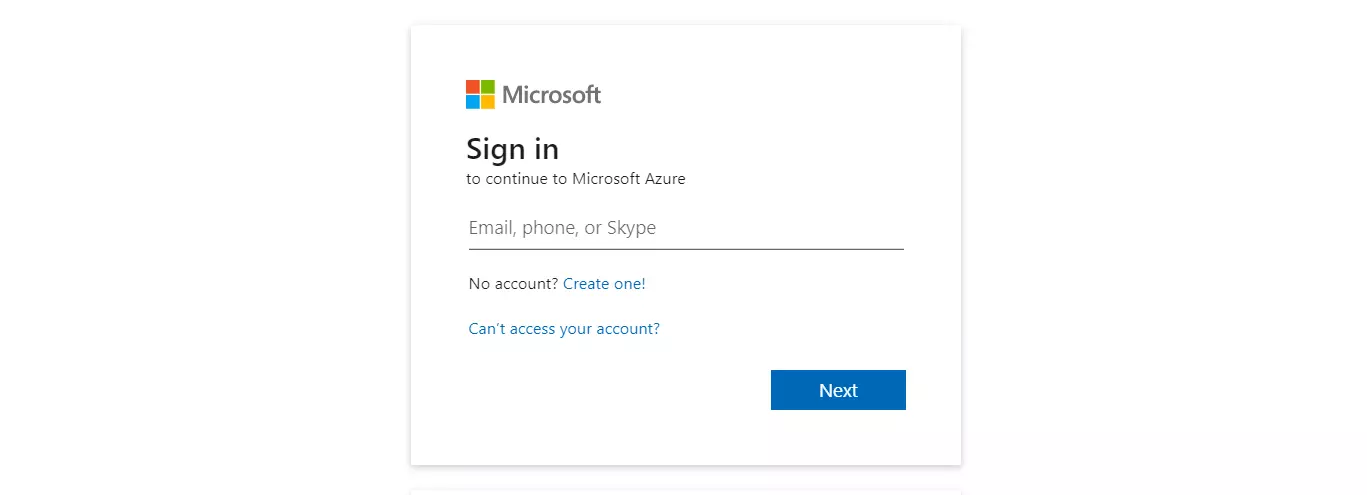
- You should be redirected to the Active Directory to authenticate.
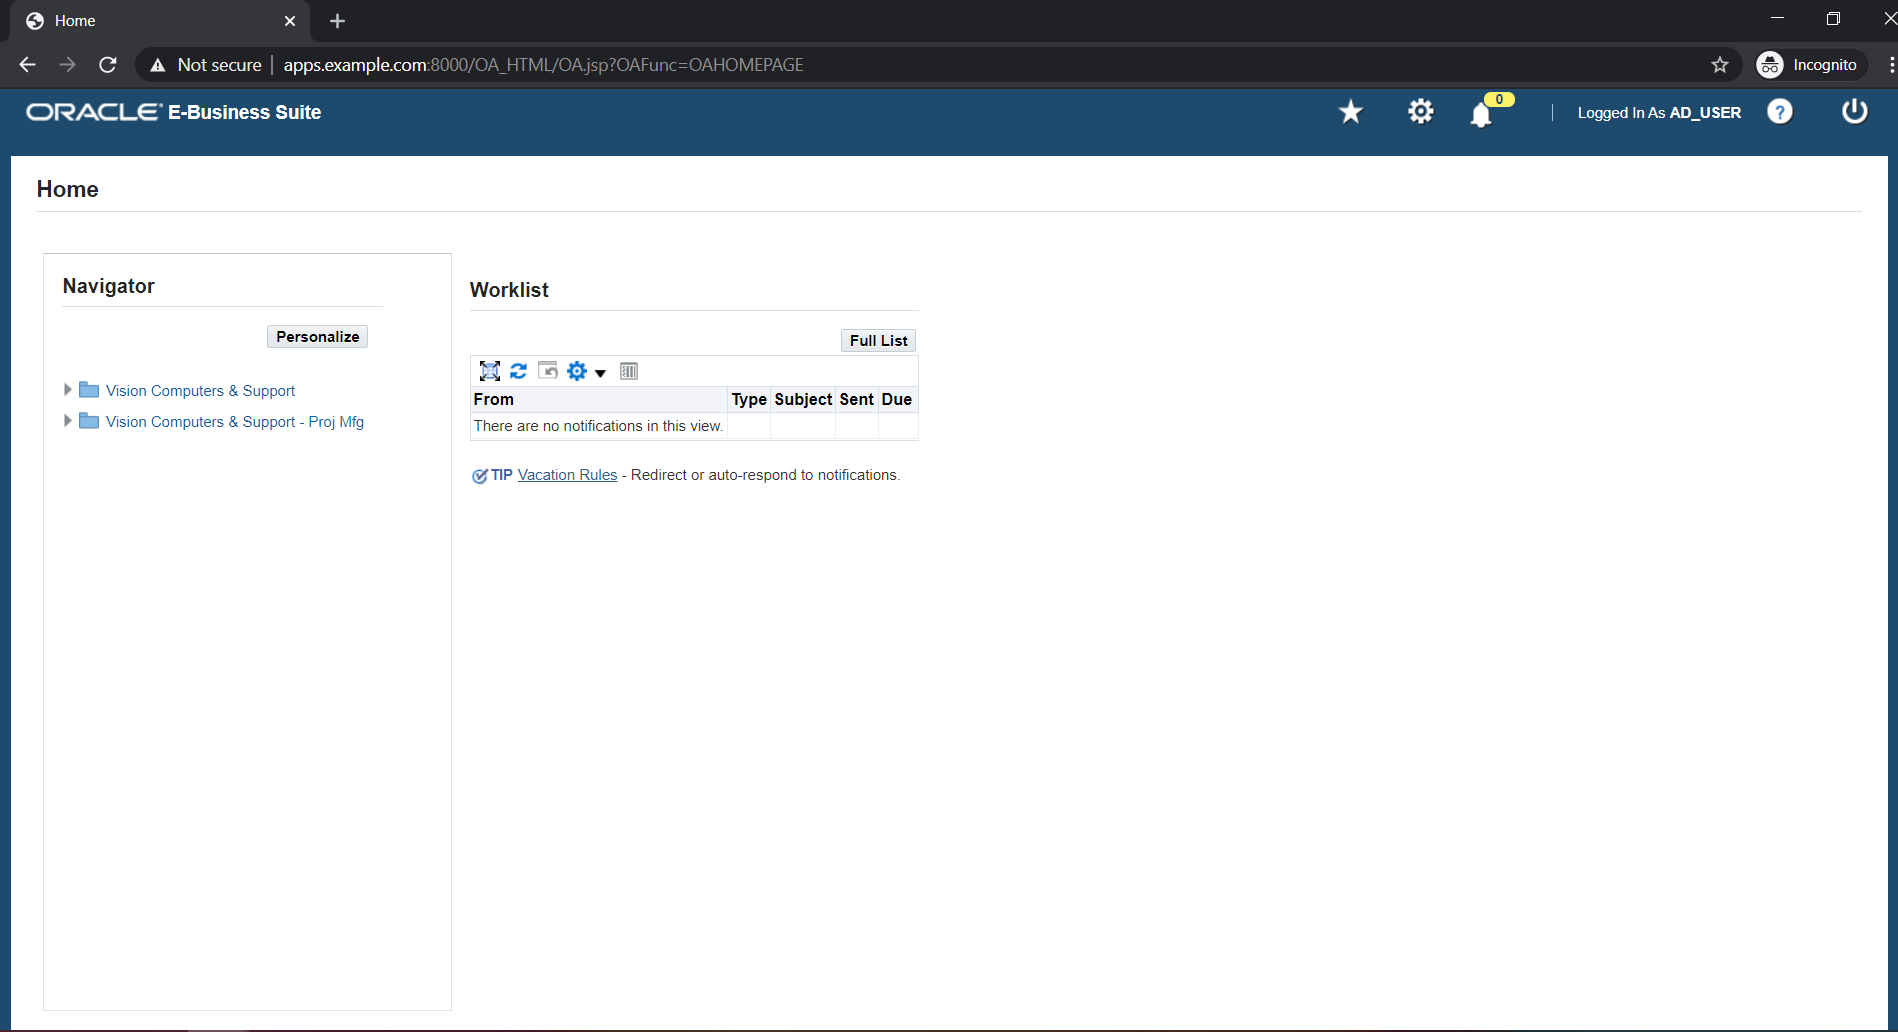
- After a successful authentication from the Active Directory, you should be logged into Oracle EBS.
8. Configure Redirection to miniOrange
- Login to Oracle EBS as SYSADMIN (or a user with the Functional Administrator responsibility).
- Navigate to Functional Administrator → Core Services → Profiles, and make the following changes:
- Search for the Profile with code APPS_SSO; change its site value from SSWA to SSWA w/SSO.
- Search for the Profile with the code APPS_AUTH_AGENT; change its site value to the APPS_AUTH_AGENT Profile Value from Oracle EBS configuration as shown in the screenshot below.
- Search for the Profile with the name Oracle Applications Session Cookie Domain; change its value from Host to Domain.
- Bounce the Application Tier of the Oracle E-Business Suite to reflect the changes.
9. Test SP-initiated Oracle EBS SSO
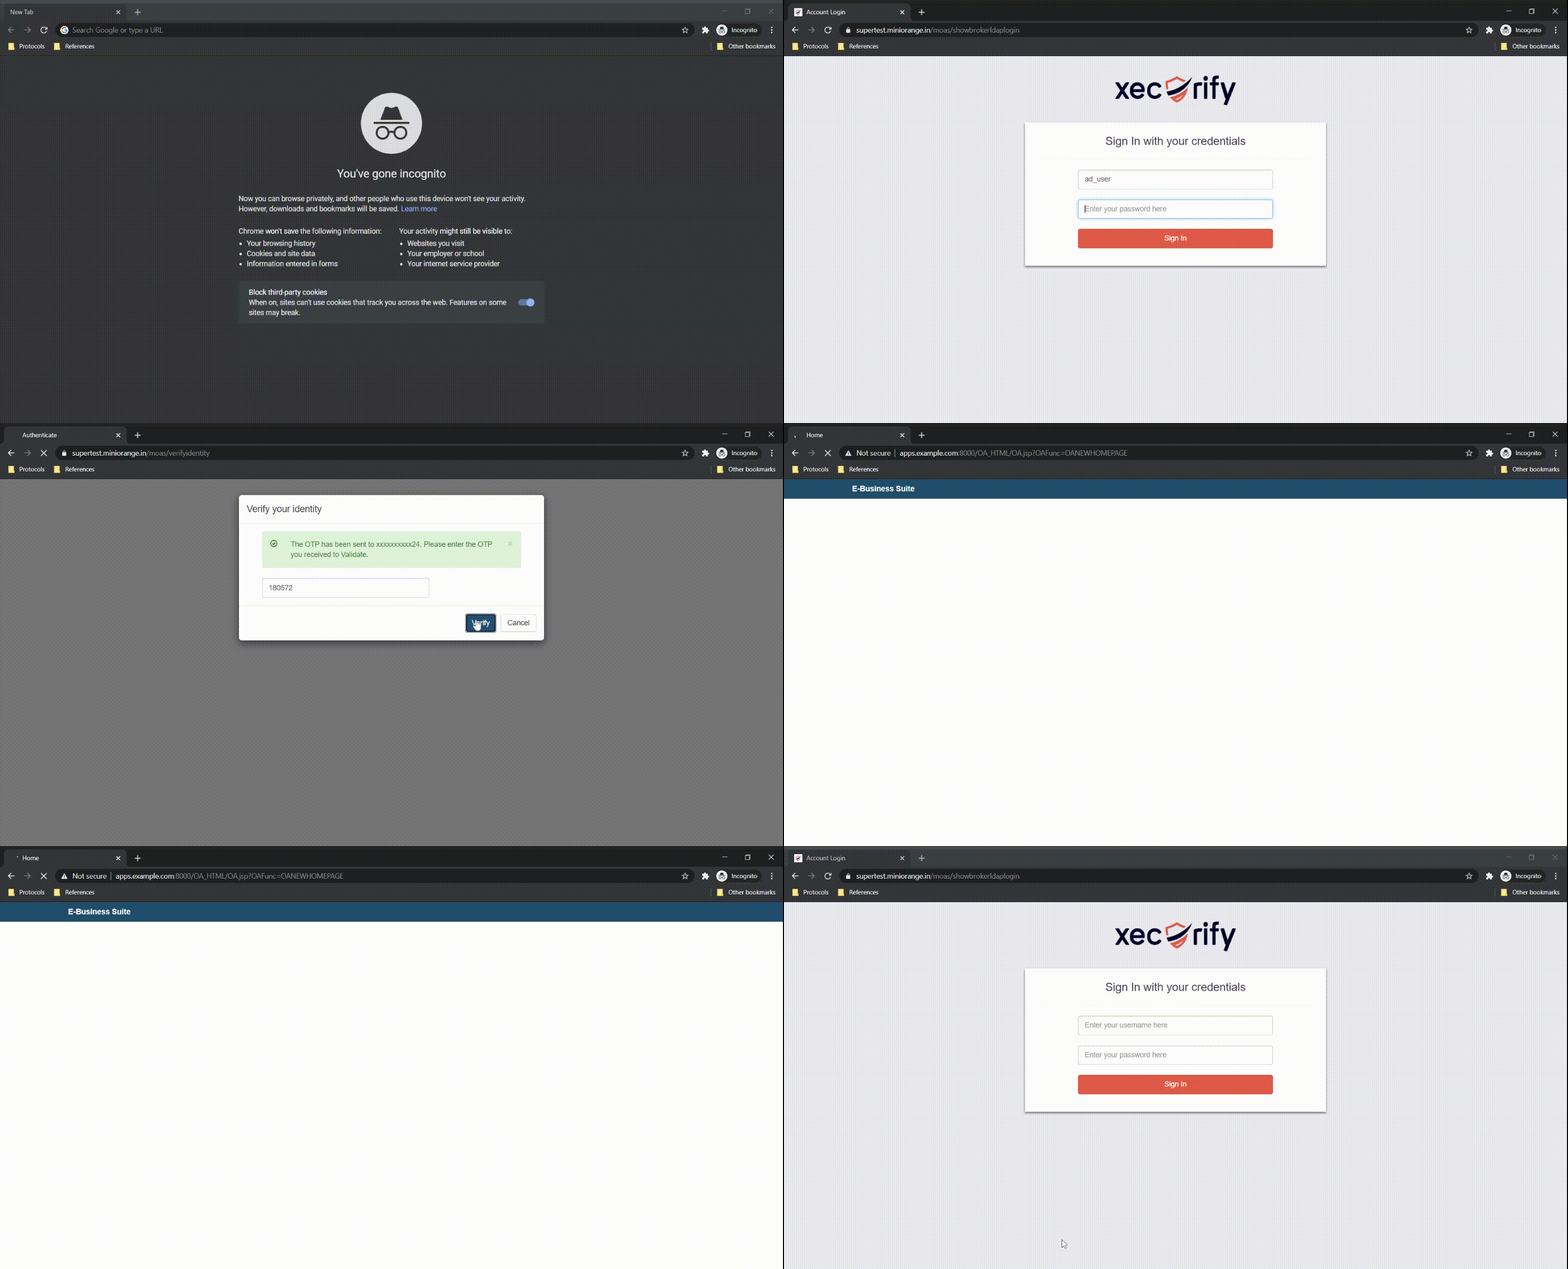
- Open up a new browser or an incognito window, and enter your Oracle EBS instance’s base URL in the address bar (e.g. https://apps.example.com:4443/), and press enter.
- You should be redirected to the Azure Active Directory login Screen.

- After a successful authentication from the Active Directory, you should be logged into Oracle EBS.

- You have now successfully configured the miniOrange EBS SSO Connector for Single Sign-On (SSO) into Oracle EBS using Azure Active Directory (AD).
References


